On November 10, 2017, Progress announced plans to discontinue Telerik Platform. They will continue to support Telerik Platform until May 10, 2018. Telerik has provided this six month transition period to customers so that they can shift their work from Telerik platform to some other platform.
In this blog, we will discuss migrating hybrid apps developed on Telerik platform to PhoneGap build.
Reasons for selecting PhoneGap Build
- Doesn’t require Mac to build iOS application.
- Cloud based so no need to setup PC to get started.
- PhoneGap has large community
The best option is to use the Telerik platform to export app as Cordova CLI which can then be used to create PhoneGap Build. In this blog, First we will export app as Cordova CLI and with the help of it we will create a PhoneGap build.
Requirements for Cordova CLI
- Log in to Telerik platform.
- Go to Project Navigator > Properties
- Navigate to the General tab and then change the old Cordova version to latest version and wait for the operation to complete.
Exporting app using Cordova CLI:
- Log in to Telerik platform.
- Go to Apps tab & then click on the Export to Cordova CLI button for the project you want to migrate.
- On button click, zip file for the project will be downloaded.
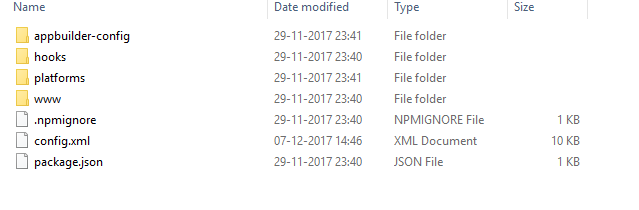
- Unzip the zip file & you will see the following folders as shown below-
Process for creating PhoneGap Build
- Log in to PhoneGap.
- Now Navigate to Apps & open private tab.
- Here you have to upload the zip file that you exported using Cordova CLI from Telerik. You can upload the zip file which you exported as Cordova CLI. But you should change the config.xml before uploading, you have to do some changes which are as follow-
- → You can remove the optional files & folders (app builder-config, hooks, .npmignore & platforms) from the exported folder that are not required for creating a build.
- → Main changes should be done in config file if required according to following conditions -
- ★ Add the latest PhoneGap version using the preference as shown-
<preference name='phonegap-version' value='cli-7.0.1' /> - ★ Check if following preferences are present inside
<platform name="android"></platform> tag-
<preference name="splashscreen" value="splashscreen" />
<preference name="splashScreenDelay" value="10000" />
If not then add them. - ★ Check if the path of icon and splash screen is set right for Android & iOS.
Ex- <icon src="www/res/android/drawable-hdpi/icon.png" density="hdpi" />
<splash qualifier="hdpi" src="www/res/android/drawable-hdpi/splashscreen.png" />
the src attribute is set according to the path for res /android/. - ★ Changes related to Android should be done in the<platform name="android"></platform> tag and changes related to iOS should be done in <platform name="ios"></platform> tag.
- ★ It may be possible that the plugins installed for Telerik platform will not work on PhoneGap due to syntax or some other reasons so we have to add plugins compatible with PhoneGap framework.Syntax of Plugin for PhoneGap is -
<plugin name="com.phonegap.plugins.example" spec="~1" source="npm" />
Here spec attribute is used for locking plugin version and is optional. And for git, It is used to specify git repository. The source attribute can either be "git", "npm" or "pgb" For more info, you can refer PhoneGap docs. - ★ Add the latest PhoneGap version using the preference as shown-
- → If your app is published in Google play store, You have to upload the keystore file. Note that app should be signed for same Keystore file as that of time of publishing the app for the first time.
Now the question arises How to get keystore file?
For Generating Keystore file you have to export .P12 file from Telerik app builder You can get .P12 file by following steps:- Go to options in Telerik appbuilder and then to Mobile Tab.
- Here you will see Android and ios option, now choose Android to export .P12 file for an app
- After exporting P12 file ,use the command mentioned below in command prompt to generate keystore.
keytool -importkeystore -srckeystore <p12 file exported from app builder>.p12 -destkeystore output.keystore -srcstoretype pkcs12
Specify P12 file name in the above command.Here Keytool is a part of Java.
- → For uploading Keystore file, Follow the below mentioned steps-
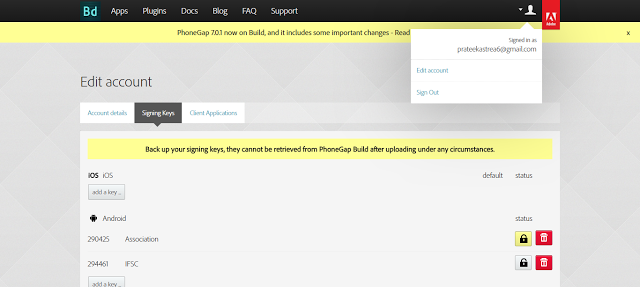
- In your PhoneGap account, Go to Edit account as shown in image below
- Now navigate to Signing Keys tab, here you can upload your Keystore file for Android.
- Now you can create the zip folder that includes www, platforms,config.xml, & package.json from exported folder and upload it in the private tab under Apps.
- After uploading zip folder for the app you exported from Telerik platform, you will see the below page
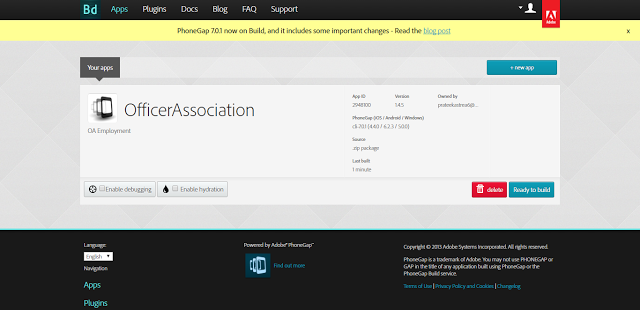
Now, we are one step away from creating a build, Tick the enable debugging option and click on Ready to build button.
If your build is created successfully you will see apk file for an android package for no key selected. You have to select the signed key and then click rebuild. If the build is created successfully you can download the apk file.
For any query on Migration Of Projects From Telerik To PhoneGap, contact support@astreait.com