Google Ads is used to bring in new customers for businesses & Salesforce’s Sales Cloud is used to track when new leads turn into paying customers. But ever wondered how we can connect these two to combine the power and gain maximum benefits? This article explains just that!
By integrating Salesforce and Google Ads, we can import our conversions from Salesforce's Sales Cloud into Google Ads which in turn helps with measuring how our online Google Ads investments are generating offline revenue. This metric can then be used to drive the right kind of traffic for our business.
-
Prerequisites for the Integration
- Be able to sign in to a Salesforce Sales Cloud account, using a login with System Administrator permissions.
- Auto-tagging should be enabled in the Google Ads account.
- Be able to edit your website code to capture the Google click ID (GCLID).
- The click-to-conversion cycle should be less than 90 days. Conversions that are uploaded more than 90 days after the associated last click are not imported by Google Ads and they do not show up in conversion statistics.
Auto Tagging
Auto-tagging is a required feature, which when used with Google Ads conversion tracking, allows you to see how effectively your ad clicks lead to valuable customer activity, such as website purchases, phone calls, app downloads, and more.
-
Auto-tagging is turned off by default. To turn it on, follow the steps below.
- Sign in to your Google Ads account.
- In the left page menu, click Settings > Account Settings > Auto-tagging
- Check the box “Tag the URL that people click through from my ad” and Save.
Steps for Google Ads Conversion Import for Salesforce
Step 1: Configure your Salesforce account
-
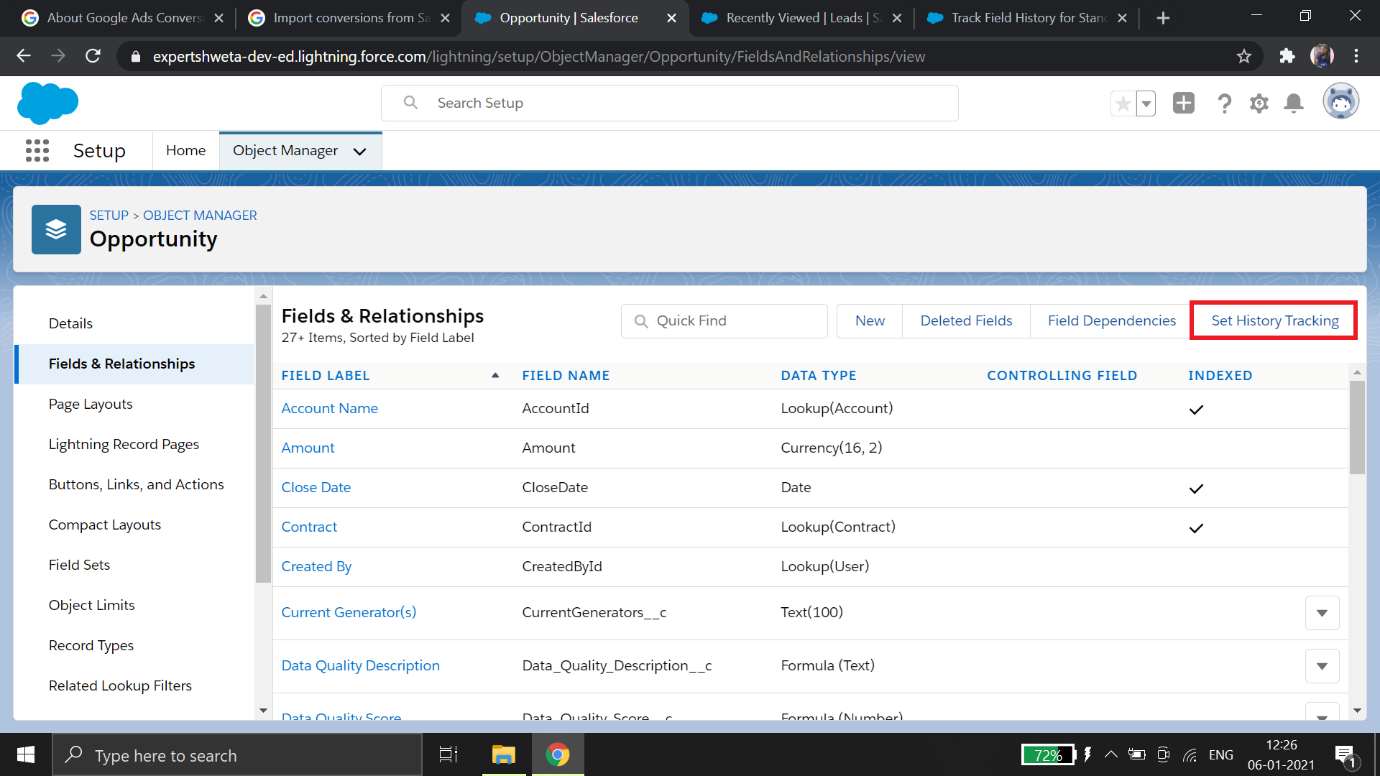
Update the Opportunity object with the following changes:
- Create a custom field with the Name "GCLID". Length should be 255 characters.
- The field should be read-only so the users don't accidentally alter it.
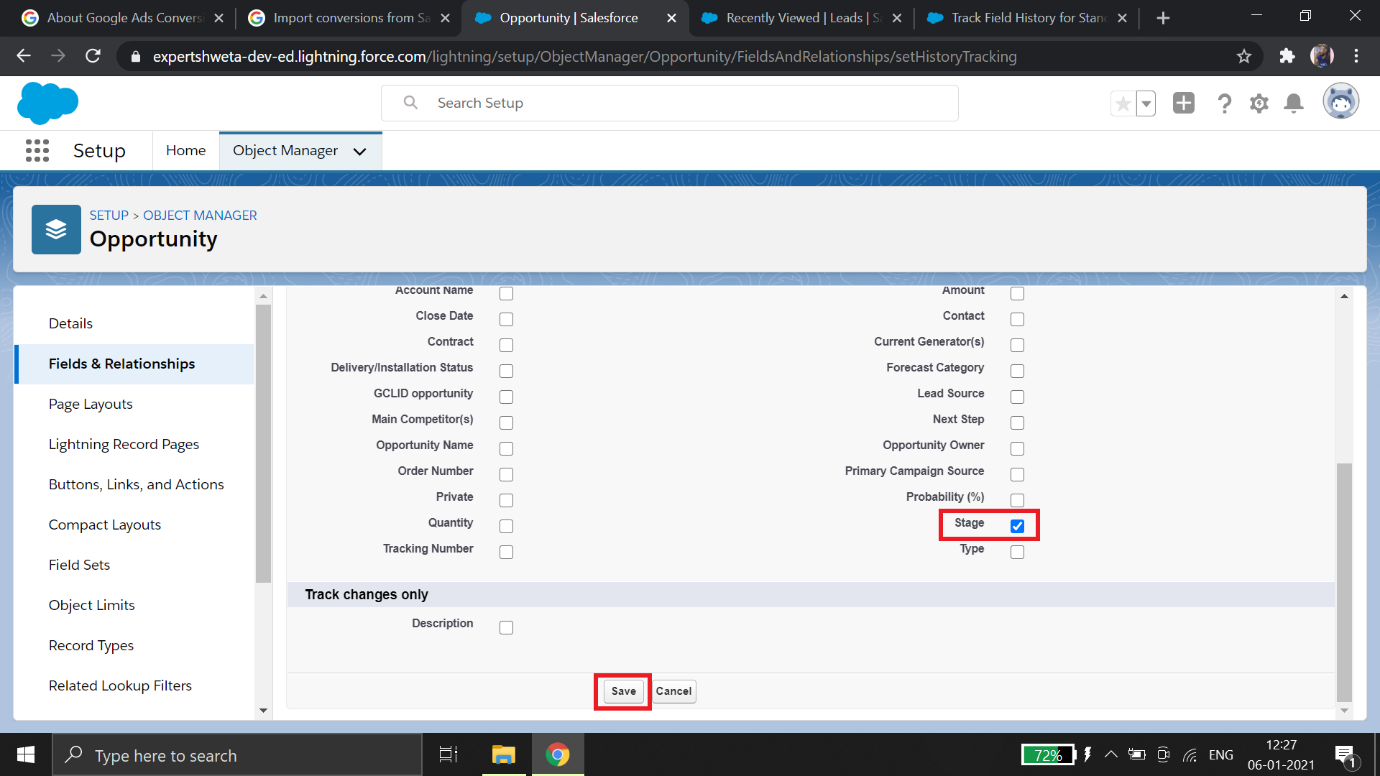
- Field history tracking for the field "Stage" should be enabled.
-
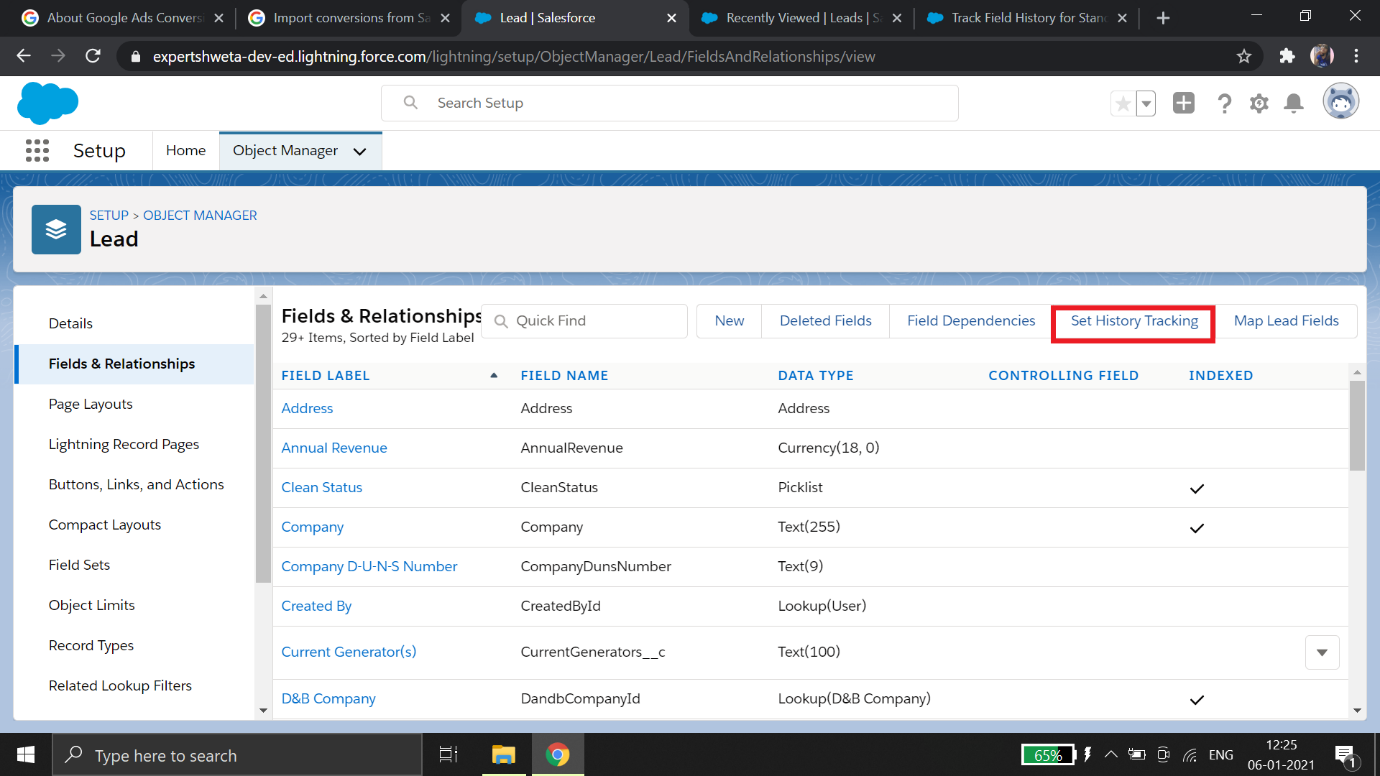
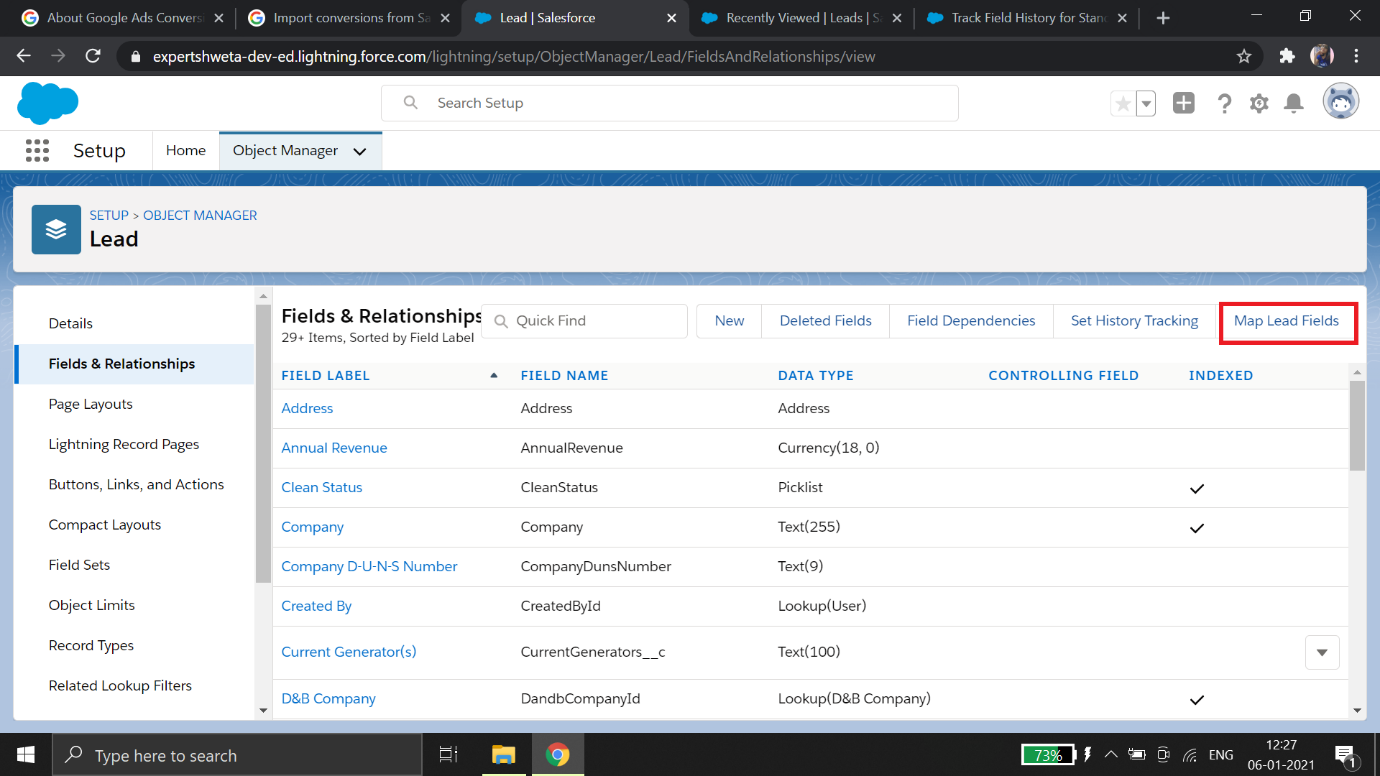
Update the Lead object with the following changes:
- Create a custom field with the Name "GCLID". Length should be 255 characters.
- The field should be read-only so the users don't accidentally alter it.
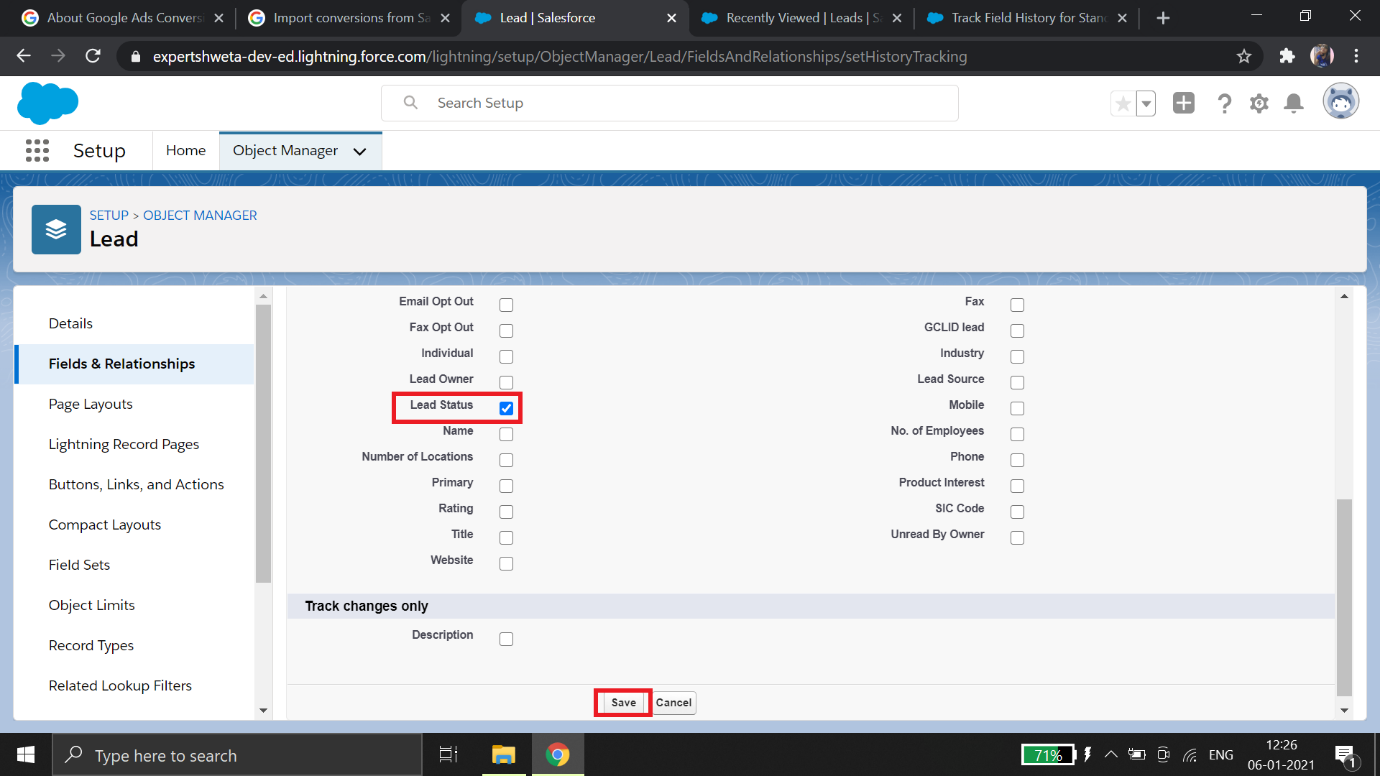
- Field history tracking for the field "Lead Status" should be enabled.
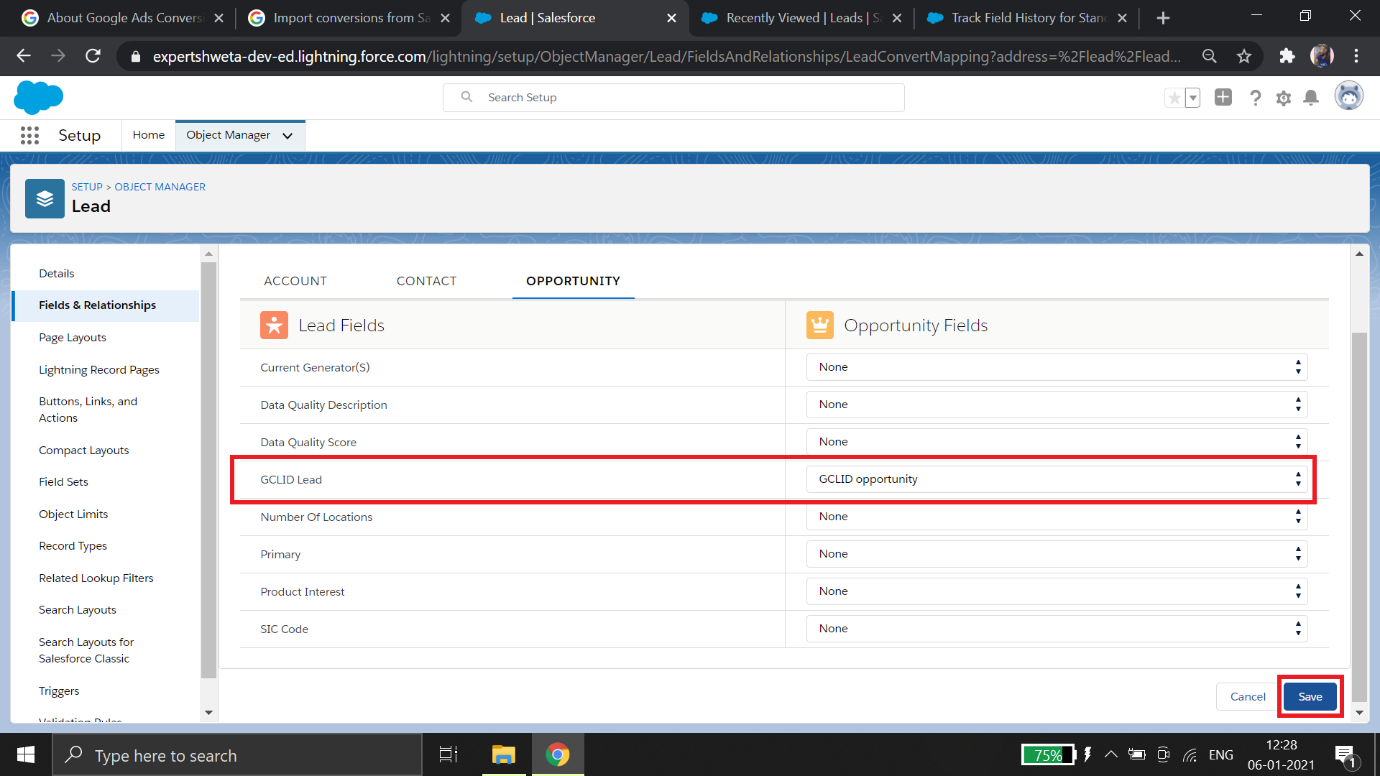
- Map the new fields: Lead.GCLID field ~ Opportunity. GCLID field.
Step 2: Adjust your Salesforce web-to-lead form
-
Create Web to lead form
- Setup > Enter Web-to-Lead in the Quick Find box. Select Web-to-Lead.
- Click Edit to enable/change Web-to-Lead settings.
- Optionally, you can specify a ”Default Lead Creator”. When a lead is created online, this user will be listed as Creator. Click Save.
- Create a form to capture prospect details on the website: Click Create Web-to-Lead Form > Select fields to be displayed on the form. Make sure to include the GCLID lead field that will capture the value of Google click Id.
- Specify the URL to which the users will be directed once they submit the information. Click Generate.
- Copy the generated HTML code and include it in the website and then click Finished.

-
To store the GCLID with your lead's information, we need to modify the web-to-lead submission form so all new leads include the GCLID value. Here’s how this can be done:
- Make the "GCLID" field that we included in Web to Lead as a 'hidden' field.
- Note the new GCLID input field's ID, as this is needed for the next step where we implement the JavaScript on the site.
- Take this new form HTML code and update the existing forms. This means that the forms will now pass the GCLID value along with the lead's information into Sales Cloud. Note: The web-to-lead form needs to be located in the same domain as the rest of the web pages, so the JavaScript can properly transfer the GCLID value to the form.
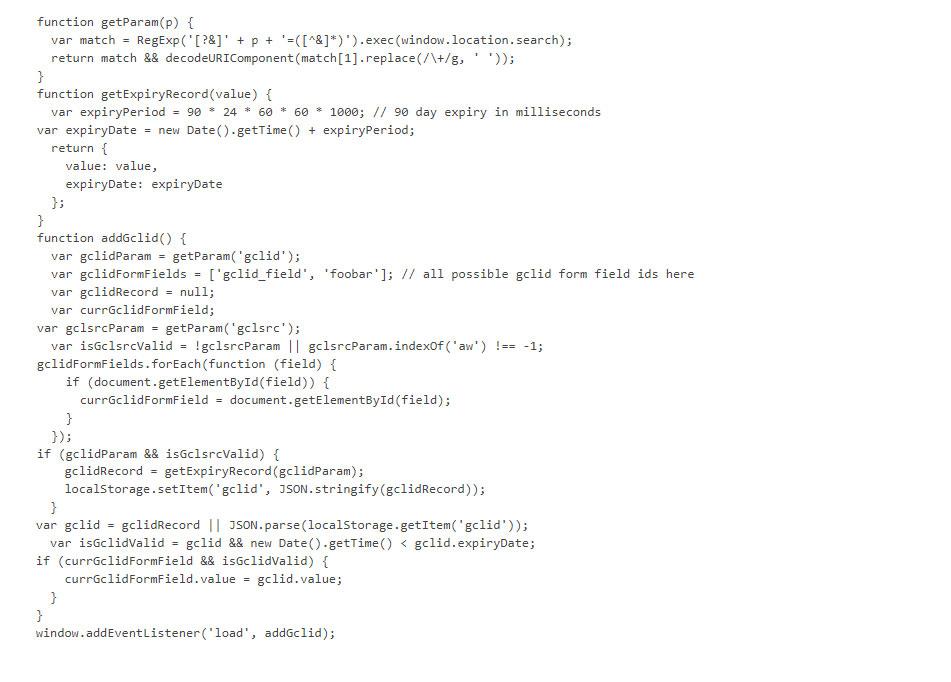
Step 3: Edit the website to collect and save the click ID in a cookie
Google Ads will append a URL parameter, "gclid", to the URL that takes to your landing page, whenever a visitor clicks on your ad. The site needs to capture and store this parameter's value so it can retrieve it later when a prospective customer enters data into the lead form.
This can be done by embedding the following JavaScript code just before the closing tag of all the pages. But before we embed the code, we need to update the 'var gclidFormFields' line to include the field IDs of the new fields that were added in the previous step. This is how JavaScript knows which field should contain the GCLID value.
Step 4: Test that your system is working
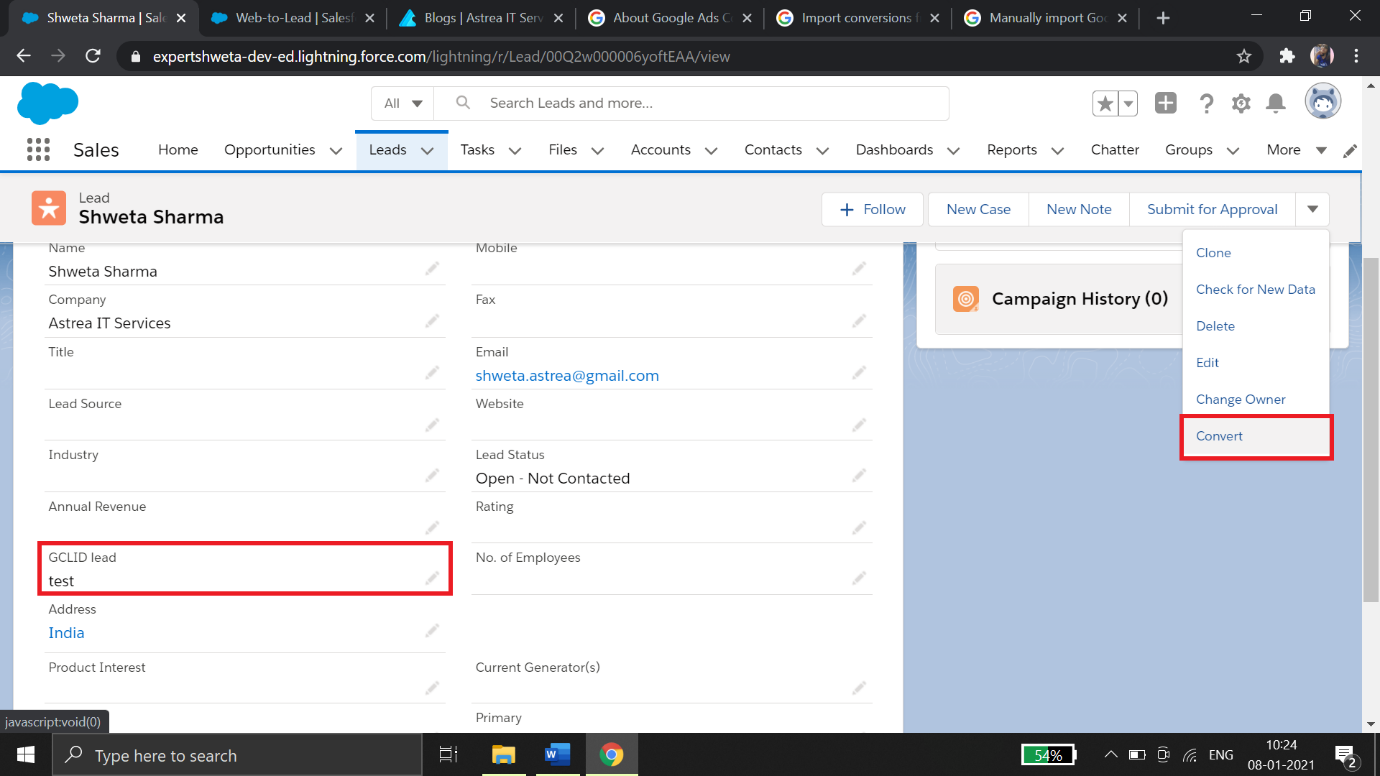
- Visit your website by adding the parameter ‘ ?gclid="test" ’ to the URL.
For eg: http://www.test.com?gclid="test" - Navigate to the lead form and create a test lead.
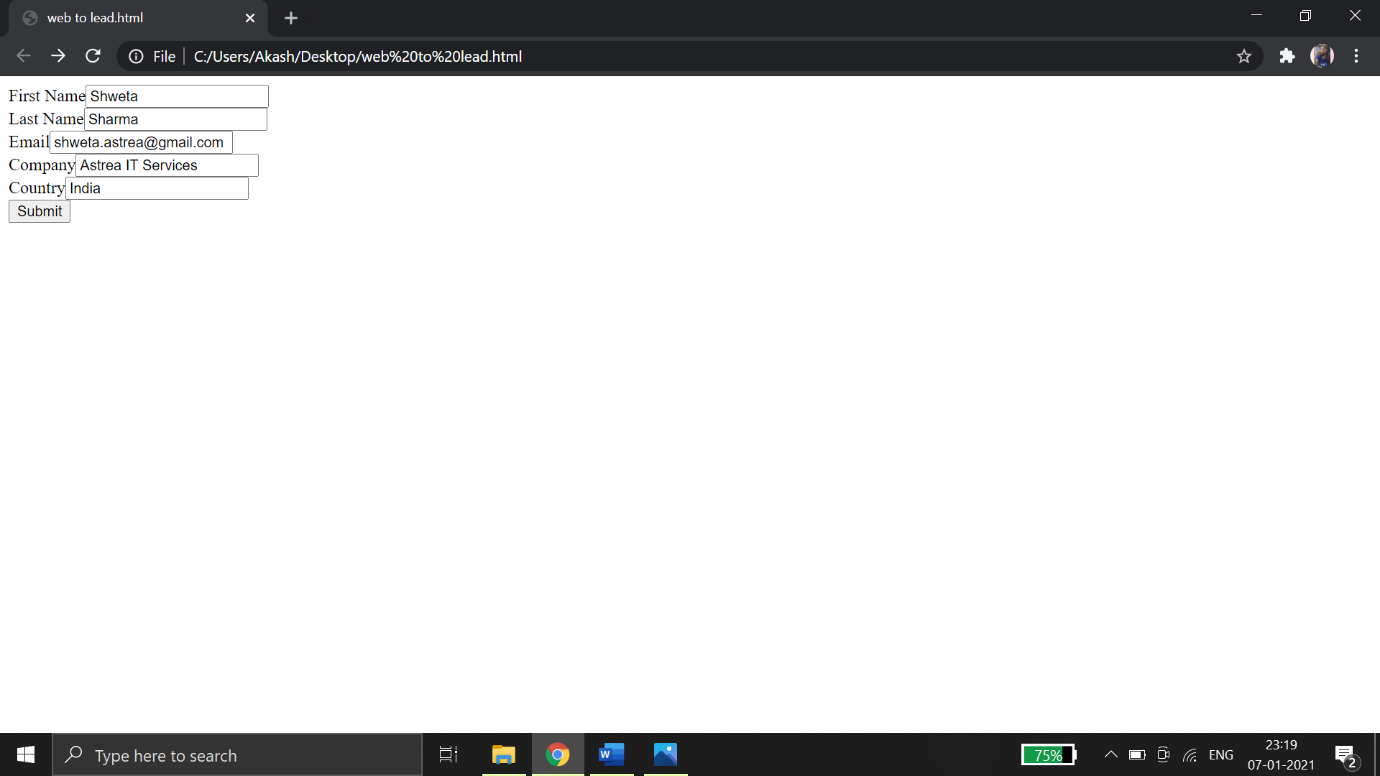
- Sign in to Salesforce. Search for the test lead created in the previous step, and see if the custom GCLID field shows the value "test."
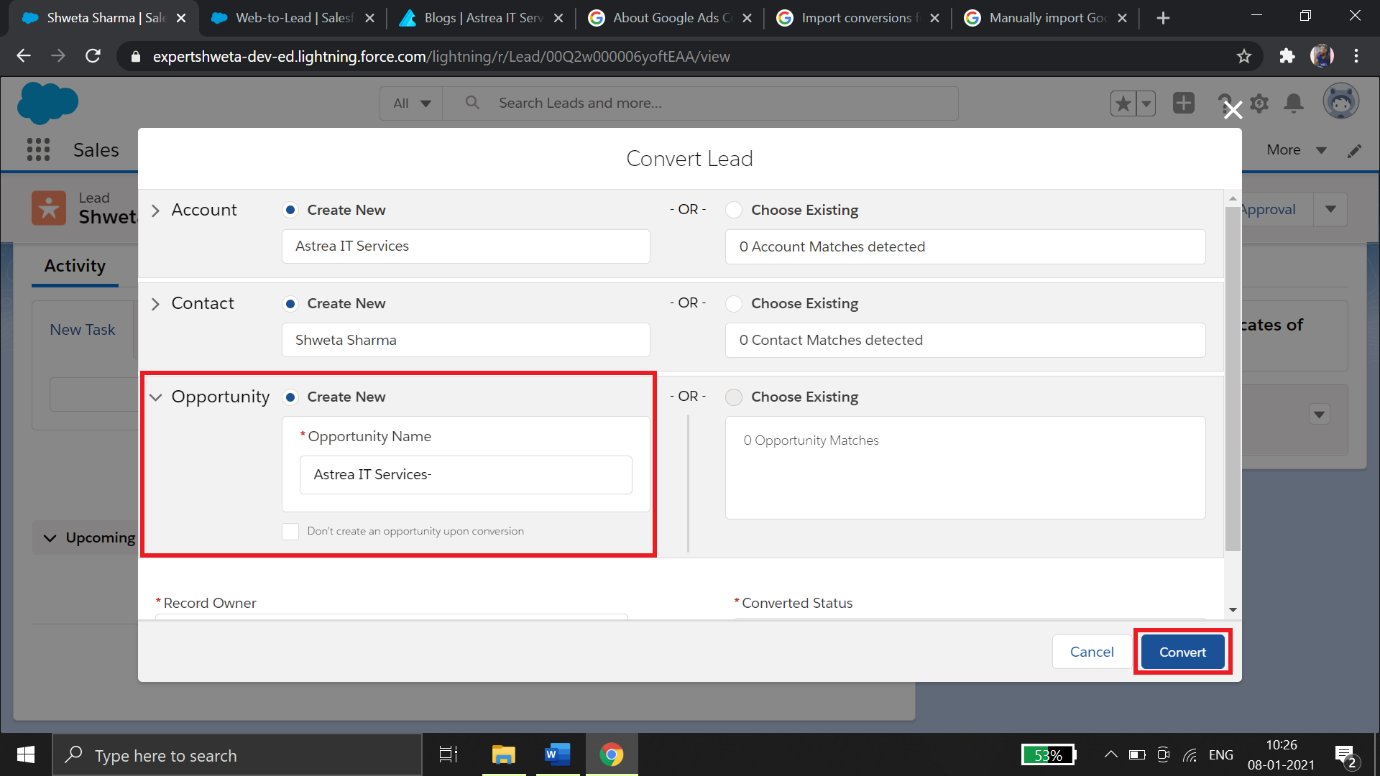
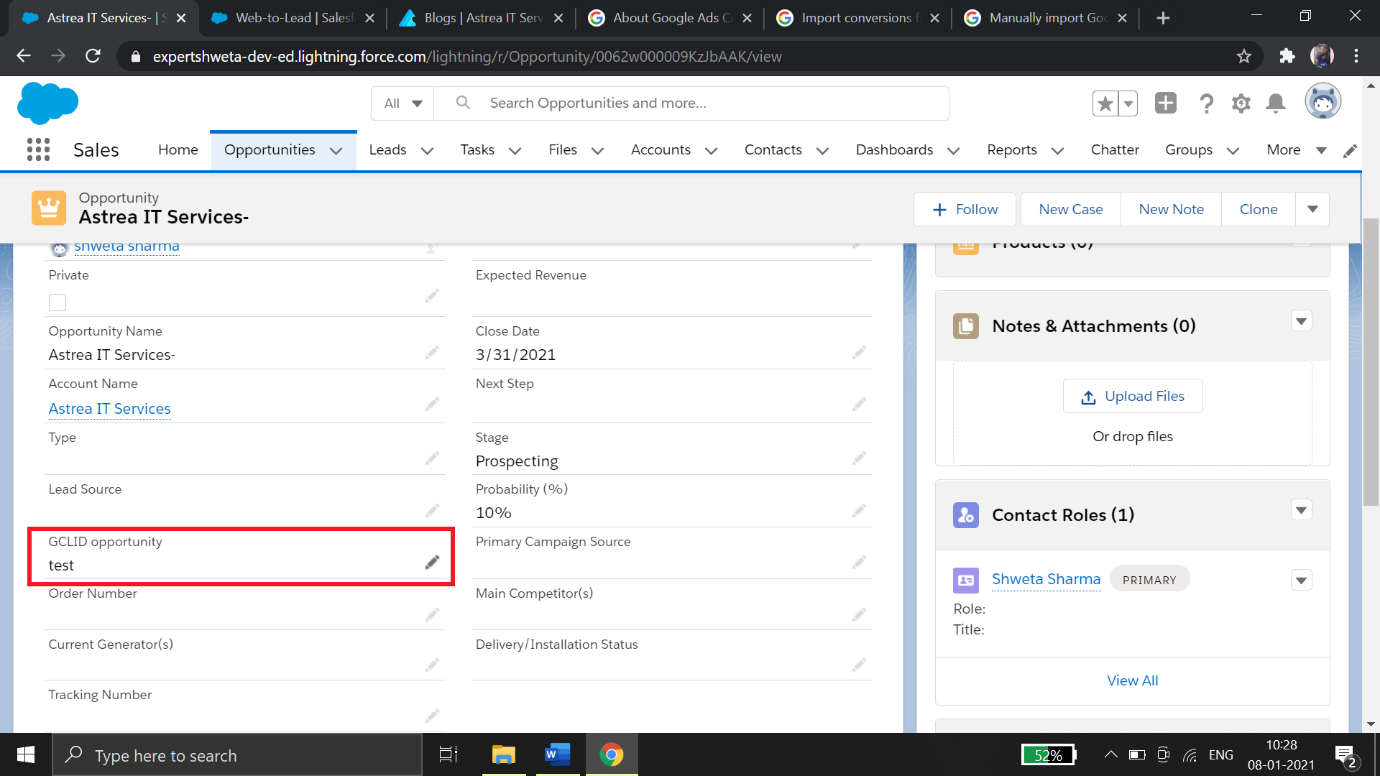
- Convert this test lead to an opportunity. The converted opportunity's custom GCLID field value should also be "test."
- Repeat steps 2 - 4 for all of your lead forms to ensure that each of the forms is configured properly.
Step 5: Linking Google Ads and Salesforce accounts
- Sign in to your account of Google Ads.
- Click the tools icon in the upper right corner.
- Click Setup> Linked accounts.
- Click Salesforce > Details.
- click Link.
- Your Salesforce login page will open. Enter the Salesforce credentials click Log in.
- Click Allow to allow the Google Ads Conversion Import app to access parts of your Salesforce account in order to link the accounts.
-
Follow the steps below to configure your account:
- Point your cursor over the “Not configured” status.
- In the pop-up window that appears, click Configure. Now choose which Salesforce Cloud milestones to import as conversion actions.
- Associate conversion actions with your Salesforce milestones.
- Now the status on the linked accounts page should be “Linked” in the “Status” column.
Mechanism / Working
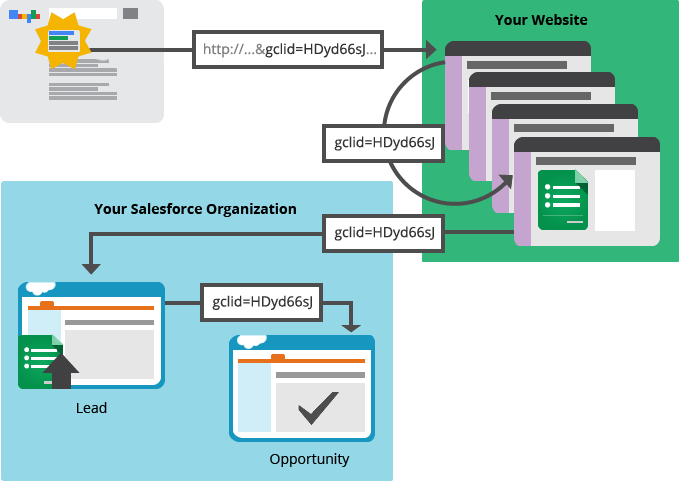
The mechanism for the whole process is as follows:
- When a prospective customer clicks on your ad, which leads to your website. Google sends the Google Click Id (GCLID) to your website.
- The prospective customer explores your web pages, he reads descriptions & watches videos. He enters his information into your lead submission form that uses Salesforce's Web-to-Lead solution. Your website stores the GCLID in a cookie and then sends the GCLID value along with the lead information submitted by the customer on the form to your Salesforce org.
- When a lead is "qualified" , it is converted to an opportunity. Then, an opportunity record is created with the initial stage "prospecting" and the value of GCLID is also shown in opportunity’s record. Salesforce stores this conversion data in the opportunity history so Google Ads can later retrieve when the click resulted in a lead conversion.
- Salesforce stores this event in the opportunity history when the stage of opportunity becomes "Closed Won" , so Google Ads can later retrieve when the click resulted in a win.
- Google Ads regularly check the Salesforce account to see if you have recorded any new important conversion that resulted from Google Ads. Google Ads will know if this conversion originated through an ad, because if it did originate from your ad, it will have that unique Google Click ID that your website stored and passed it to Salesforce. If so, Google Ads will count that milestone as a Google Ads conversion.
- Your Salesforce login page will open. Enter the Salesforce credentials click Log in.
- Click Allow to allow the Google Ads Conversion Import app to access parts of your Salesforce account in order to link the accounts.
-
Follow the steps below to configure your account:
- Point your cursor over the “Not configured” status.
- In the pop-up window that appears, click Configure. Now choose which Salesforce Cloud milestones to import as conversion actions.
- Associate conversion actions with your Salesforce milestones.
- Now the status on the linked accounts page should be “Linked” in the “Status” column.
While this integration focuses on connecting Google Ads with Salesforce to measure offline revenue, similar bi-directional integration patterns are commonly used when connecting Salesforce with other enterprise platforms. For example, in a Salesforce–D365 integration, APIs and secure authentication mechanisms enable seamless data flow between CRM and ERP systems. Understanding these broader integration architectures helps organizations design scalable and future-ready system ecosystems.
For any query on Google Ads Salesforce Integration, contact support@astreait.com