In today's interconnected business landscape, collaboration and data sharing between organizations play a vital role in fostering growth and success. Salesforce, being a robust CRM platform, offers a feature called Salesforce-to-Salesforce (S2S), which allows seamless sharing and synchronization of data between multiple Salesforce instances. In this blog post, we will explore the concept of Salesforce-to-Salesforce, its usefulness in various scenarios, the setup process, its limitations, and best practices to ensure successful implementation.
What is Salesforce-to-Salesforce?
Salesforce-to-Salesforce is a powerful data sharing capability that enables organizations using different Salesforce orgs to collaborate and share relevant data securely. It provides a secure and controlled way to exchange data, records, and updates between Salesforce instances, ensuring consistent and up-to-date information across multiple organizations.
2. Dynamic Results: Row level formulas generate results that are specific to each record in the report. This flexibility allows users to perform calculations on a granular level and gain insights into individual data points.
Usefulness of Salesforce-to-Salesforce:
1. Partner Relationship Management: Salesforce-to-Salesforce is particularly useful in scenarios where organizations have established partnerships or channel relationships. It enables the seamless sharing of leads, opportunities, and other relevant information between the organizations involved, streamlining the sales process and improving collaboration.
2. Mergers and Acquisitions: When organizations undergo mergers or acquisitions, data integration and consolidation become critical. Salesforce-to-Salesforce simplifies the process by allowing the sharing of data between different Salesforce instances, facilitating a smooth transition and providing a unified view of customer data.
3. Distributed Sales Teams: Organizations with distributed sales teams can leverage Salesforce-to-Salesforce to share leads, account information, and updates across various regional or departmental Salesforce instances. This ensures that all team members have access to the most accurate and up-to-date data, enhancing collaboration and driving productivity.
Setting up Salesforce-to-Salesforce:
Step 1. Enable Salesforce to Salesforce
Switch to Salesforce Classic before enabling Salesforce to Salesforce. If you’re using Lightning Experience, click your profile picture and select Switch to Salesforce Classic.
1.From Setup, enter Salesforce to Salesforce Settings in the Quick Find box, then select Salesforce to Salesforce Settings.
2.Click Edit.
3.Select Enable.
4.Click Save.
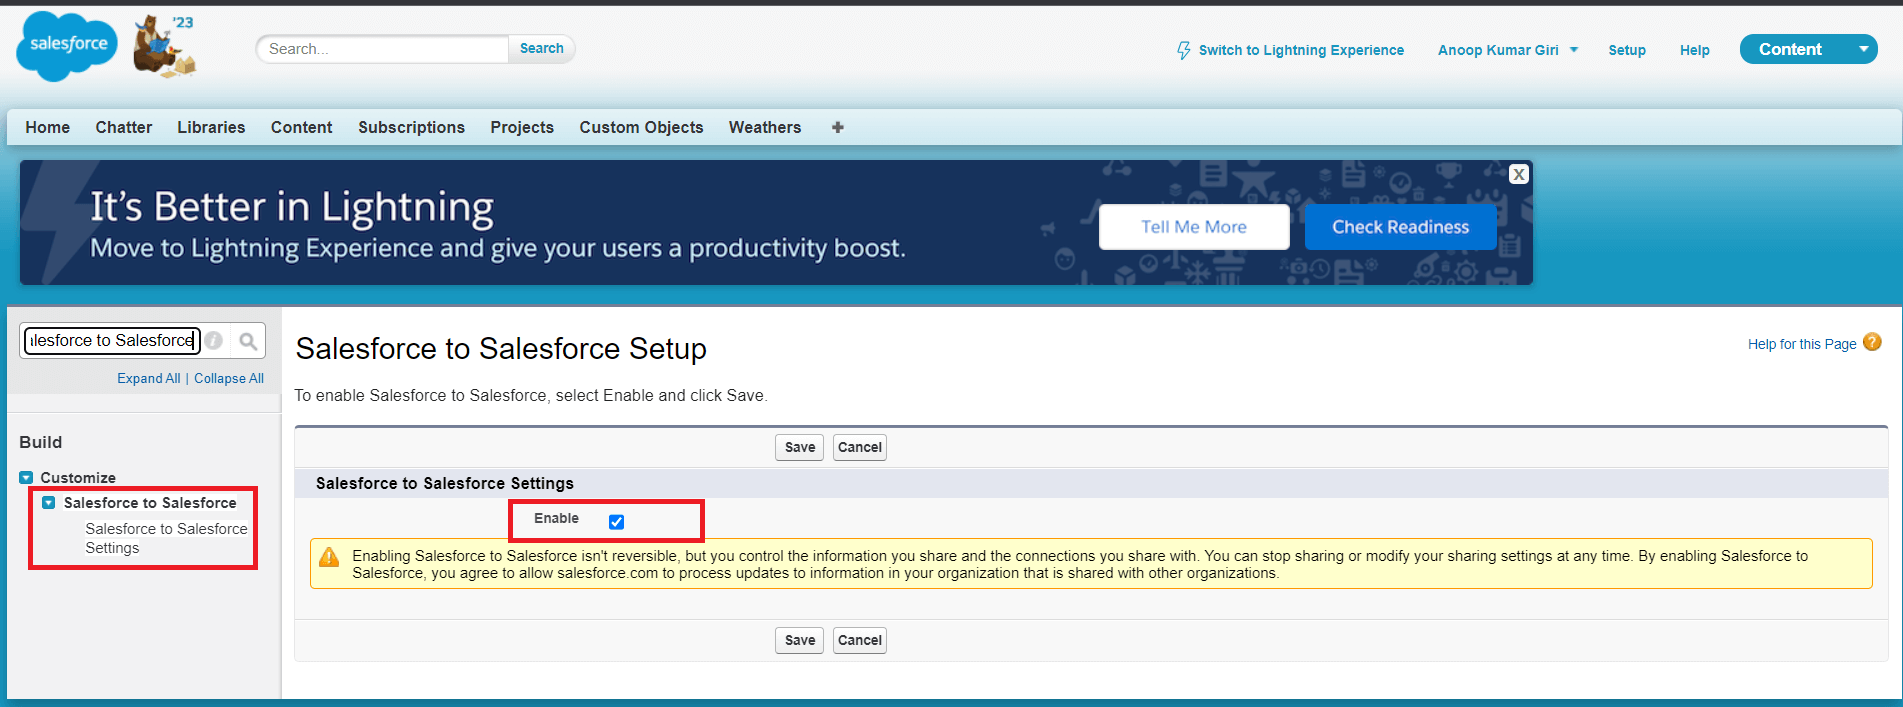
Figure 1: Enable Salesforce to Salesforce
Step2: Setting up a Connection
Assuming both the orgs have S2S enabled, we now need to establish a formal relationship between the orgs before the actual sharing of records can take place. This is done by setting up a Connection as described below:
1. Go to the Connections tab. If you don't have one, Click the plus (+) symbol on the tabs menu and search for Connections
2. On the Connections tab, click New to create a new connection with another org
3. Select a contact under an account representing the other org you want to share records with via S2S, and click Save & Send Invite. The invitation email will be sent to the email address under the selected contact.
4. When you click Save & Send Invite, the Destination user will receive an email with a link to Accept or Decline the invitation
5. Click on the link, Login and hit Accept for the connection to start sharing records.

Figure 2: Setting up a Connection of Salesforce to Salesforce
Step 3: Publishing Objects
1. To Publish objects click on Publish in the Connection tab, and select the object that you wish to publish.

Figure 3: Publish Object: Select the object that needs to be published
2. Select Edit on an object to choose the fields that you wish to publish to the other org.

Figure 4: Publish Fields: Specify the list of fields to be published
Step 4: Subscribing to Published Objects
The destination org doesn't automatically have access to the data published from the Source org. Instead, the org needs to first subscribe to the objects published.
1. login to the destination org subscribe to an object and map the fields. This is done by navigating to the Connections tab, selecting the designated connection, and hitting Subscribe.

Figure 5: Set up Subscribe Objects in Salesforce to Salesforce
2. An additional flag Auto-Accept is sometimes displayed. If this option is selected, then records from the publishing org will be automatically accepted.
3. Click Save and this completes the object level mapping. Now you need to map the fields. Do this by clicking on Edit next to the subscribed object.

Figure 6: Setup the list of Subscribe Fields
Step 5: Share Records
Records can be shared in two ways , either manually or programmatically.
1. Manual Sharing of Records:
a. Go to List view for the object and Select the records and click on “Forward to connection”. (Note that only users with the Manage Connections profile permission will see the Forward to connection option.) Conclusion:

Figure 7: Sharing of Records using Salesforce to Salesforce
b. Records will be automatically created in the destination org if the auto-accept for the object is enabled. If not enabled, the records sent need to be explicitly accepted in the destination org
2. CProgrammatic sharing of records via Apex
Limitations of Salesforce-to-Salesforce:
1. Data Limitations: Salesforce-to-Salesforce has certain limitations on the types of data that can be shared, such as standard and custom objects, custom fields, and certain relationship types. It is important to review and understand these limitations to determine the feasibility of data sharing in specific use cases.
2. Complex Configurations: Implementing Salesforce-to-Salesforce can involve complex configurations and setup processes, especially when dealing with large volumes of data or multiple Salesforce instances. It is advisable to seek expert guidance or consult Salesforce documentation to ensure a smooth and successful implementation.
Best Practices for Salesforce-to-Salesforce:
1. Data Governance: Establish data governance policies and guidelines to ensure data integrity and security. Clearly define ownership and access rights for shared data, and regularly review and monitor data quality to maintain consistency.
2. Data Mapping and Field Consistency: Pay close attention to data mapping and ensure consistency between field names, data types, and validation rules across the participating Salesforce orgs. Consistent data structure and validation rules prevent data discrepancies and enhance data accuracy.
3. Regular Communication and Collaboration: Foster regular communication and collaboration between the organizations involved in Salesforce-to-Salesforce. This ensures that any changes, updates, or data discrepancies are promptly addressed, reducing potential conflicts and enhancing data synchronization.
4. Testing and Validation: Prior to enabling Salesforce-to-Salesforce, thoroughly test the setup and data sharing processes. Conduct comprehensive validation checks to ensure that the shared data is accurate, and the integration meets the desired expectations.
Salesforce-to-Salesforce offers organizations a powerful solution for sharing and collaborating on critical data across different Salesforce instances. By leveraging this capability, businesses can streamline their operations, enhance collaboration with partners, and gain a unified view of customer data. With careful planning, adherence to best practices, and a thorough understanding of its limitations, Salesforce-to-Salesforce can become a valuable asset in driving growth and success.
For any queries on this functionality, please reach out to support@astreait.com.