Pardot
Pardot is a marketing automation solution that helps companies create meaningful connections, generate more pipeline, and empower sales to close more deals. Pardot can automate your marketing activities and unite your marketing and sales departments so that they can work better together.
While lead generation is crucial, retaining customers is equally important for long-term business success. After capturing and nurturing leads, businesses should focus on building lasting relationships through consistent engagement strategies. Salesforce Marketing Cloud provides tools to improve customer retention by delivering personalized and timely communication.
What Are Pardot Forms And Its Use
Pardot Forms are the native option for creating lead capture forms in Pardot. Using a Pardot Form means you can take advantage of pre-filled fields, progressive profiling and other advanced features – however, despite the multiple benefits up for grabs, they are not always the default choice.
We use a Pardot form when we want to collect information about people visiting our website or landing page. Pardot forms are simple to set up and maintain, entirely from inside Pardot’s point-and-click form builder. There are lots of resources available that cover how to create Pardot forms and the function of each setting, so instead, I thought that I would call upon my experience working as a designer to drum up some tips that are often not found on the official help documentation. I will briefly introduce each and explain why I consider them sneaky. You will come out of this clued up and in a better position to maintain Admin control!
Capturing leads through Pardot Forms is just the first step in the marketing journey. Once the data is collected, it is essential to nurture these leads through personalized communication and automated workflows. Salesforce Marketing Cloud enables businesses to design automated lead nurturing journeys that guide prospects through the funnel and improve conversion rates.
For creating a new form we must have to follow these processes:
First, login to the pardot account and under the Marketing tab find Forms and click on it. Now you will see a button called ‘ Add Forms ’ in the right corner, then click on this button. A popup will appear, give the name of the form and select campaign from the dropdown as well. Now let’s discuss some of the important points:
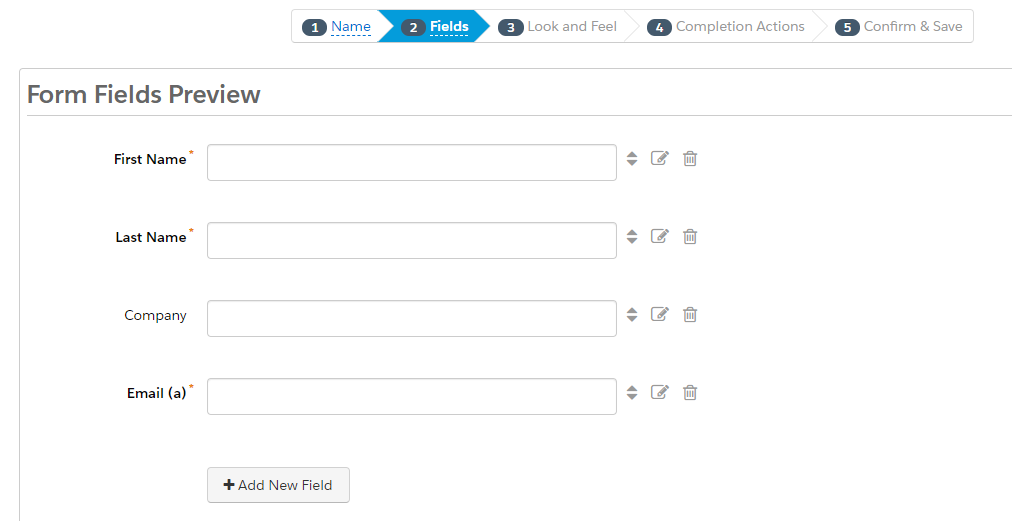
- Where to Add fields in Pardot Forms?
Now you know that a form without a field is nothing. We can add any fields, textarea, checkbox and radio button by clicking the button called ‘ Add New Field ’.
- Forms vs. Form Templates

Every form is based on a template. This is how forms can look different from one another, or share the same style for branding consistency, and to save time when creating them. You set this on Step 3 of the Form Wizard called ‘Look and Feel’:
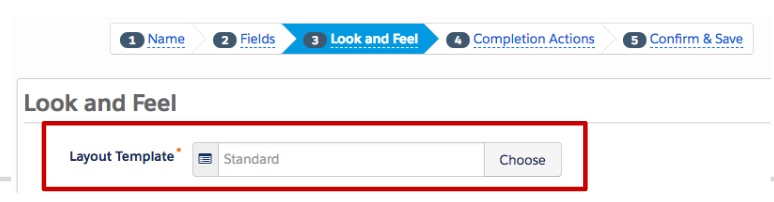
Your template needs to exist before you get to this stage in creating the form. Layout Templates define the style of both forms and landing pages.
We can add a submit button in the same tab by writing submit button text under the layout template selection option. We can also add some paragraphs or headings at the top of the form or at the bottom of the form. - Where to Add Style to Pardot Forms?
Now you know that a form’s style is controlled by the layout template, using CSS which is code that controls how HTML elements are displayed on the screen (such as text font, color and field positioning).
Pardot have a ‘clicks not code’ philosophy, and so have opened up some styling options in the Form Wizard: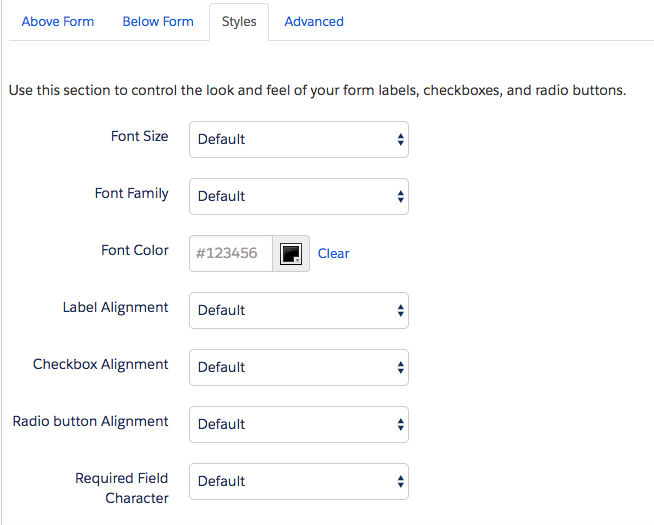
Naturally, we can customize beyond these options, eg. using custom fonts. For this, you will need to dive into the layout template section and go ‘under the hood’. It’s a ‘gotcha’ if you realize that CSS is beyond your capabilities, and you need to find other resources for those skills. Unexpected things like this can affect the amount of time it will take to develop and launch your form. - Prospect Fields
Pardot accounts include a set of default prospect fields to gather information. You can also create custom fields to capture information tailored to your needs. Only Prospect Fields are available to choose from when building forms. This means that you cannot use Prospect Account, Opportunity or custom object fields. Although frustrating for some marketers, it does make sense when we are talking about 1-to-many data relationships.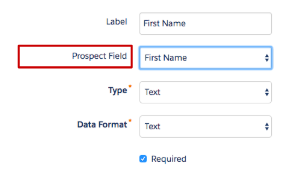
- Button ‘Load Default Data’
When adding or changing a Prospect field on a Pardot form, always click ‘Load Default Data’. This is beside the ‘Prospect field’ dropdown (step 2 of the Form Wizard). Doing this ensures the correct field type (eg. text, dropdown, checkbox etc.) is selected, and it will also pull in the predefined options for dropdowns, checkboxes, radio buttons.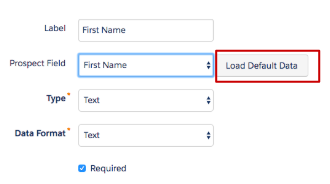
- Completion Actions
In this tab you can write Thank You Content whatever texts or codes you want to show after submission of the form. Or you can redirect to the URL instead of showing the form's Thank You Content. - Confirm & Save
This is the last tab for creating any form. Here you can save & confirm all your changes. After doing this all the changes will reflect.
After generating leads through Pardot Forms, it is important to evaluate how these leads contribute to overall marketing success. Salesforce offers Campaign Influence, which helps measure the effectiveness of campaigns and understand which efforts drive conversions and revenue. This insight enables marketers to optimize their strategies and improve ROI.
References
https://www.pardot.com/
https://trailhead.salesforce.com/en/content/learn/modules/pardot-basics-lightning/get-started-with-pardot-lightning
https://www.salesforceben.com/the-drip/advantages-using-pardot-forms-risky-alternatives/
Salesforce Marketing Cloud provides a comprehensive suite of tools to manage the entire customer lifecycle—from lead capture using Pardot Forms to nurturing, retention, and campaign performance analysis. These tools work together to create seamless and personalized customer experiences. To explore more tutorials, guides, and best practices, visit our Salesforce Marketing Cloud page.
For any query on Pardot Forms, contact support@astreait.com