Introduction
In today's digital marketing landscape, personalization plays an important role in delivering relevant customer experiences. Instead of sending the same message to every recipient, businesses can tailor email content based on customer attributes, preferences, and other available data.
Salesforce Marketing Cloud Next provides personalization capabilities that help marketers create more relevant email experiences using merge fields, content variables, data sources, and dynamic content variations.
For example, a company can personalize an email greeting with the recipient's name, display a promotional code supplied by a Salesforce Flow, or show different messages to existing customers and new prospects.
In this blog, we will explore how to configure the prerequisites for personalization and use these features to create personalized emails in Marketing Cloud Next.
What Is Email Personalization?
Email personalization is the process of customizing an email using information about the recipient.
In Marketing Cloud Next, personalization can include:
- Merge fields: Insert customer-specific values, such as a name or another supported profile attribute.
- Dynamic content: Display different content variations according to predefined rules.
- Personalization expressions: Reference supported data values or expressions to customize email content.
- Salesforce data: Use supported customer records and mapped attributes as sources for personalization.
For example, instead of sending the same greeting to everyone, an email can display:
- “Hello, Rahul!” for one recipient.
- “Hello, Priya!” for another recipient.
Dynamic content takes personalization further by allowing the message, image, or promotional offer itself to change based on the recipient's data.
Prerequisites
Before configuring dynamic content, ensure that Personalization is set up correctly and the required customer data is available.
1. Assign the Required Permissions
Ensure that the appropriate administrators have the permissions needed to configure Personalization and manage the data model.
The setup requirements in this guide include:
- Marketing Cloud Admin permission set
- Data Cloud Architect permission set
- System Administrator profile, where required for administrative setup
Assign permissions according to your organization's security policies and the tasks each administrator needs to perform.
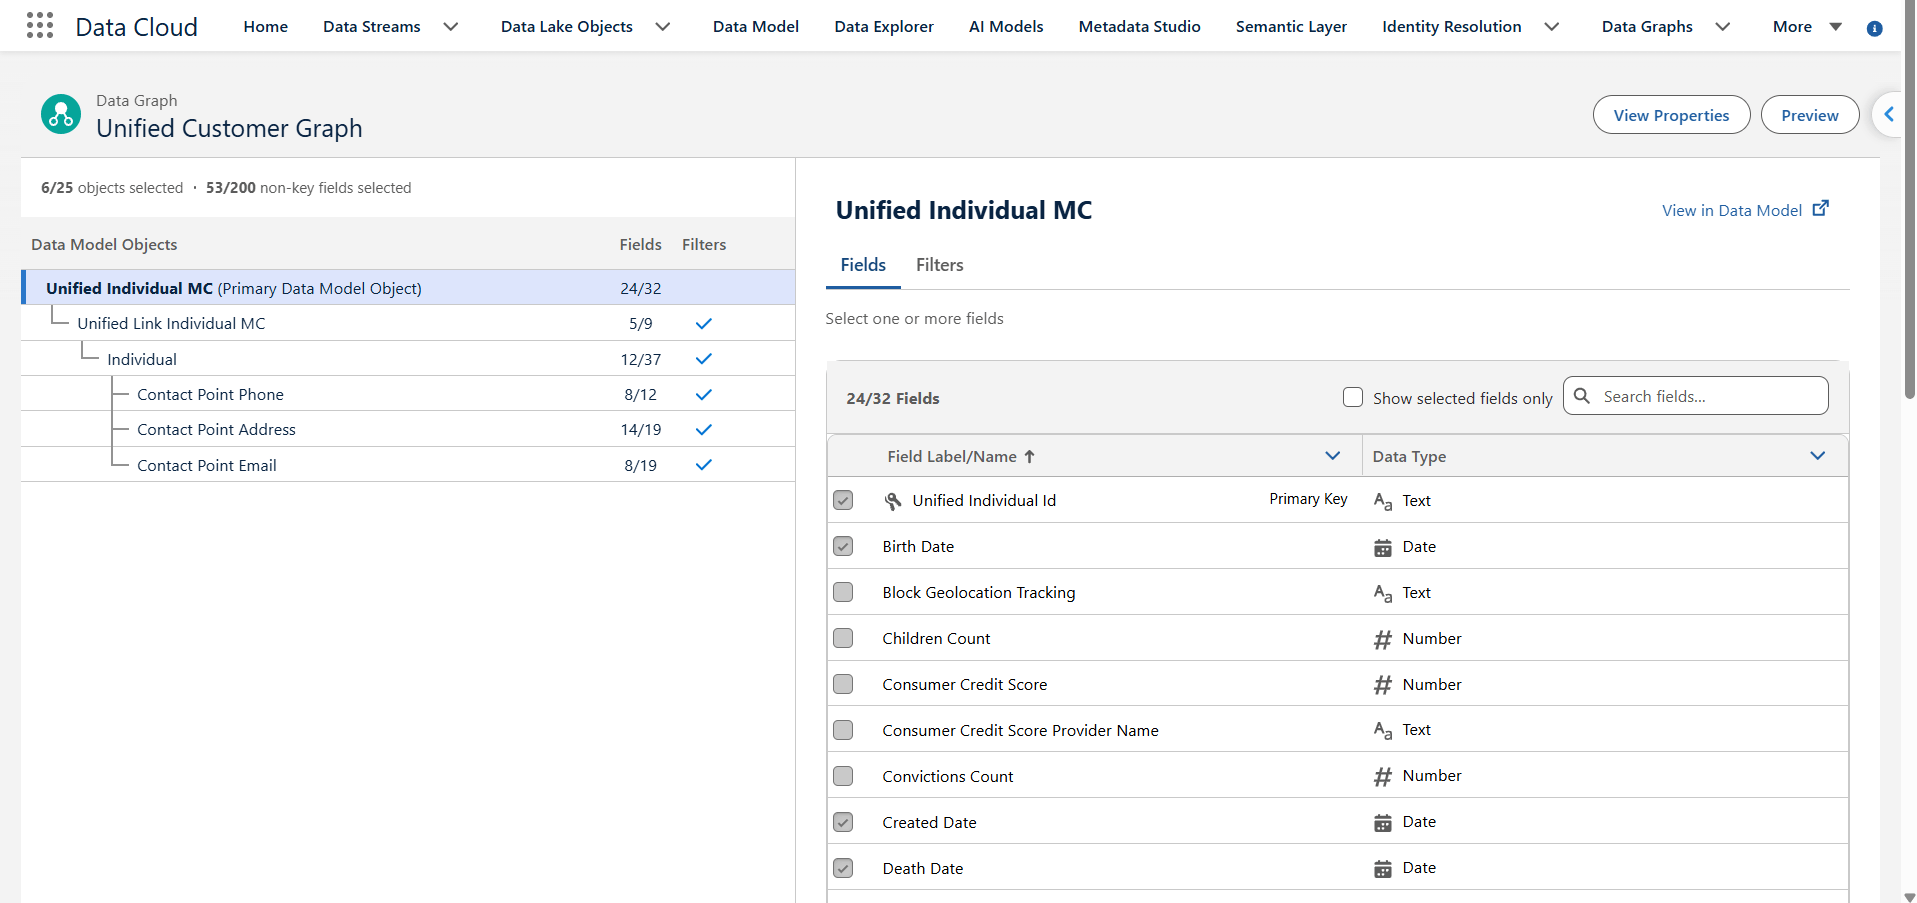
2. Create a Data Graph on Unified Individual
Create a Data Graph using Unified Individual as the primary data source. Include the fields required for personalization.
The following data relationships illustrate the fields needed.
| Data relationship | Required field |
| Unified Individual → Unified Link Individual → Individual | Individual ID |
| Unified Individual → Unified Link Individual → Individual → Contact Point Email | Email Address |
| Unified Individual → Unified Link Individual → Individual → Contact Point Phone | Telephone Number |
These fields provide a starting point. You can add other fields required for your dynamic content, such as First Name, Customer Category, or Product Preference, provided they are available through the configured Data Graph.
3. Set Up Salesforce Personalization
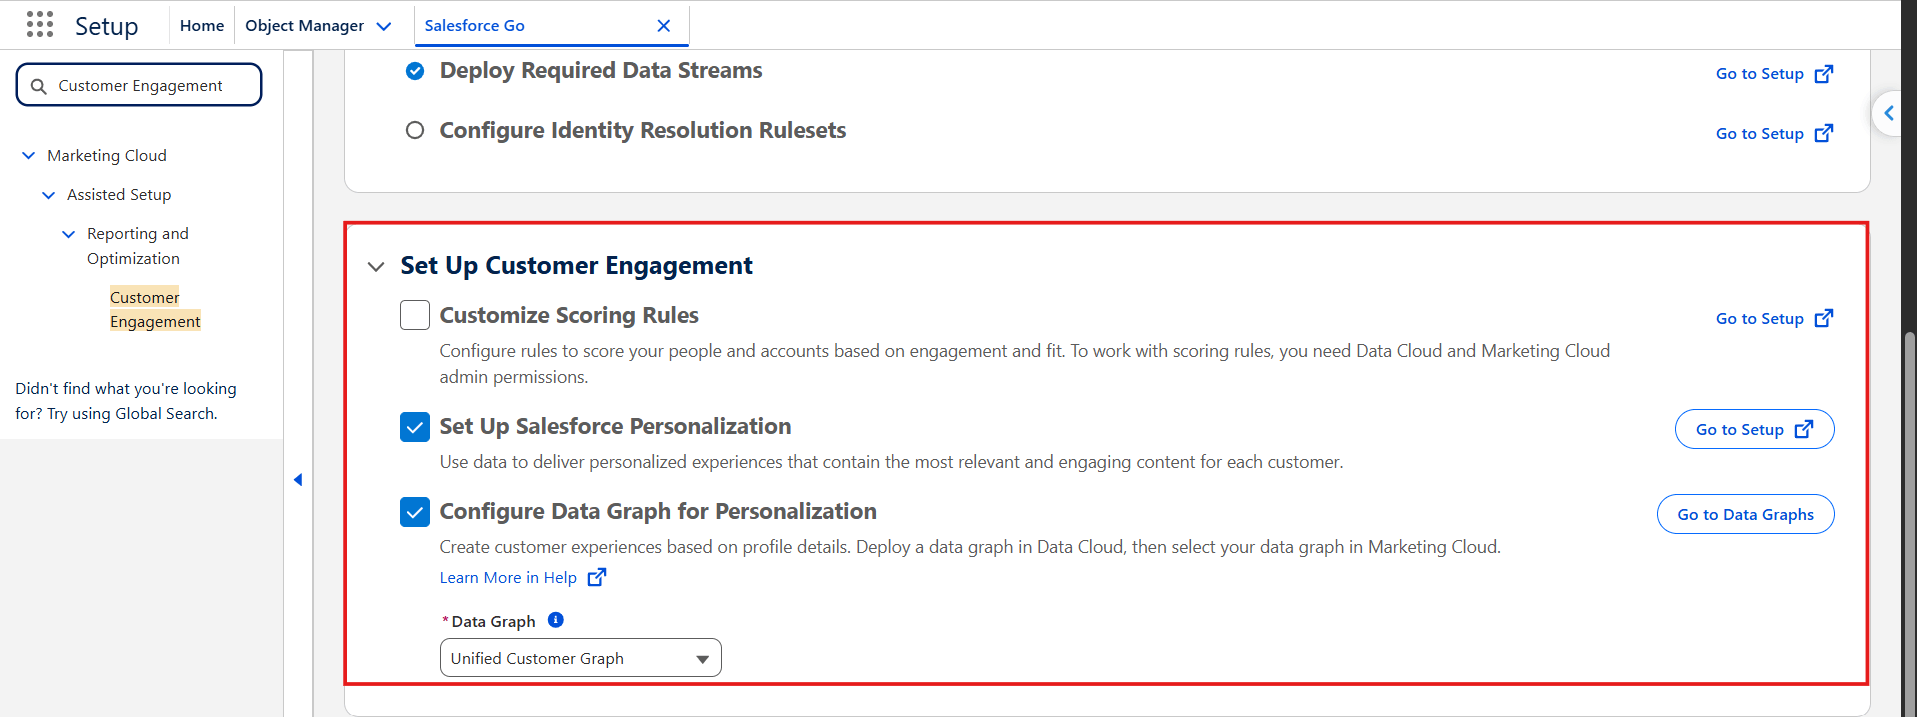
After creating the Data Graph, configure Personalization in Salesforce Setup.
Follow these steps:
- Navigate to Setup.
- Open Customer Engagement.
- Click Go to Personalization Setup.
- Click Start Setup.
- Select the appropriate data space.
- Click Deploy to complete the setup.
After setup is complete, configure the Data Graph for Personalization and make it available to your email content.
4. Verify the Required Fields and Data Types
Before using personalization, verify that the required fields are available through your configured data source.
For example, you might need:
- Individual ID
- Email Address
- First Name
- Telephone Number
- Customer Category
The fields you need depend on the personalization scenario. For example, displaying a customer's name requires the appropriate name attribute, while showing different promotional messages requires attributes that can be used in targeting conditions.
Also verify the supported data types for the merge fields, content variables, and expressions you intend to use.
How to Configure Dynamic Content and Merge Fields
Once Personalization and the required Data Graph are configured, open your email in the Marketing Cloud Next email editor.
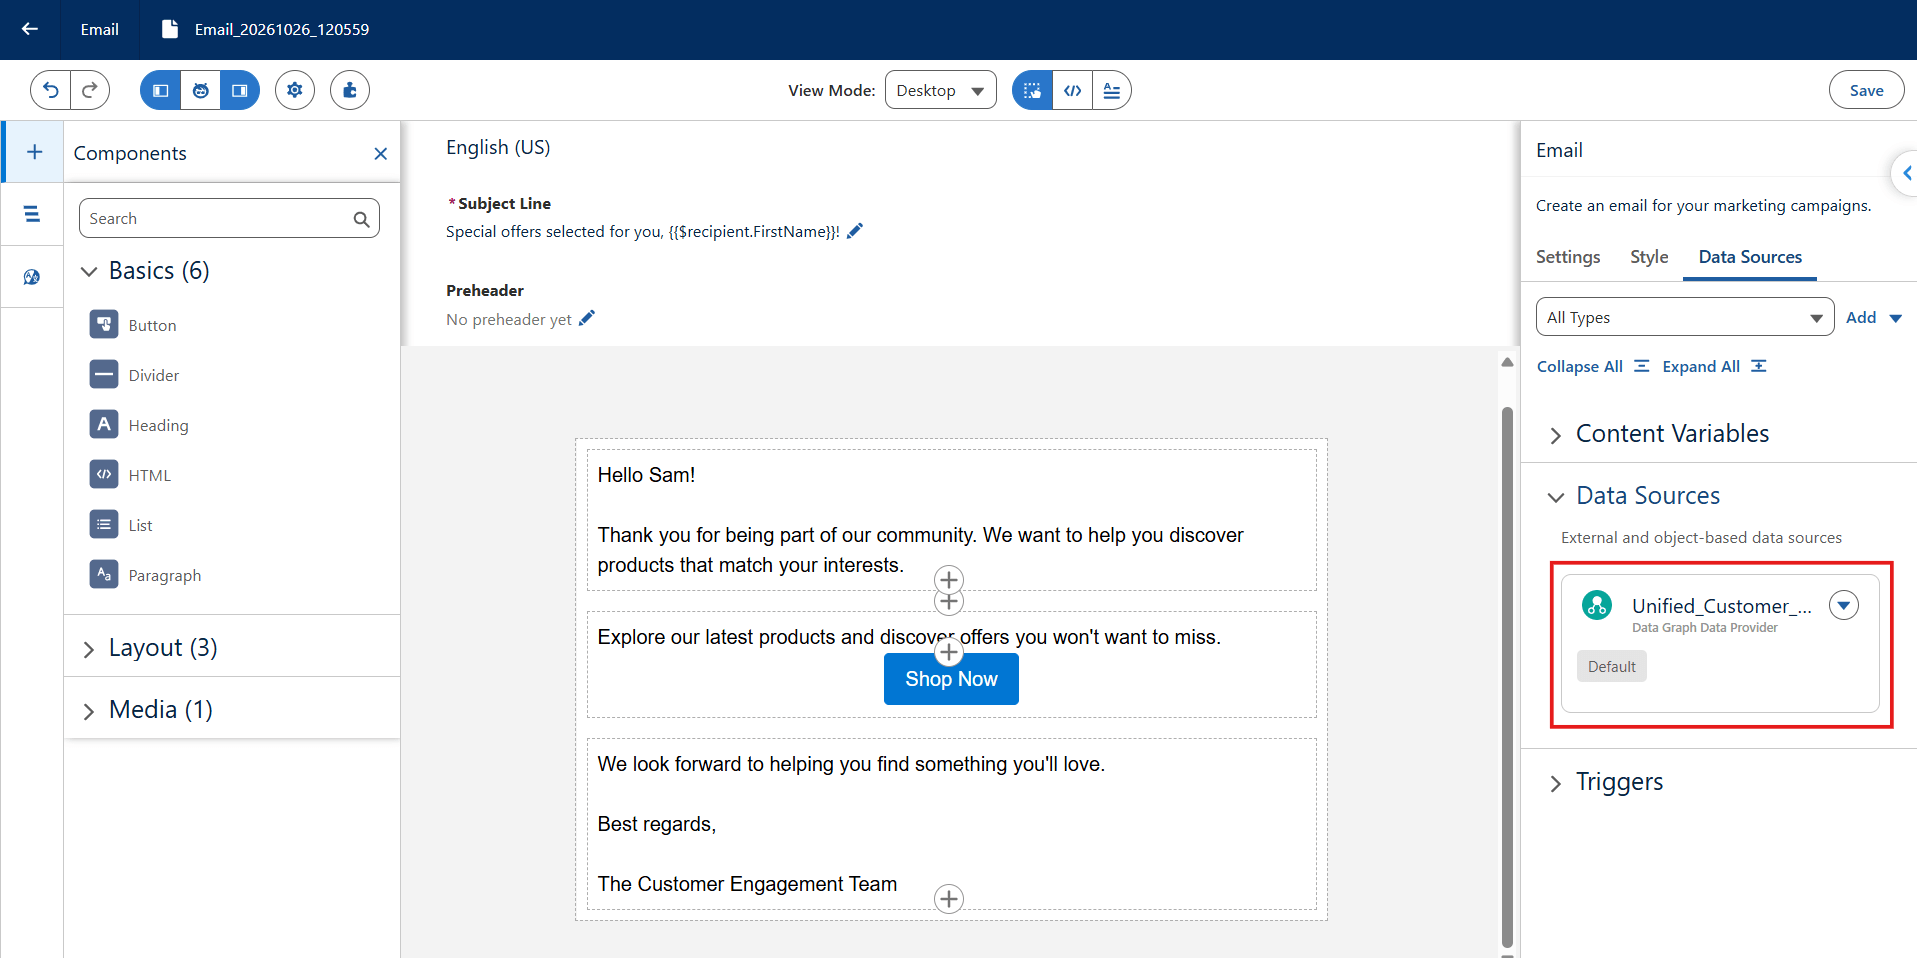
In the right-side panel, select the Data Sources tab. As shown in the editor, this panel contains three main sections:
- Content Variables
- Data Sources
- Triggers
Understanding these sections will help you prepare the data and configuration required for email personalization.
Step 1: Add a Data Source
Before inserting merge fields or configuring dynamic content, connect the data that your email will use.
Follow these steps:
- Open your email in the editor.
- Select the Data Sources tab.
- Expand the Data Sources section.
- Click Add.
- Select the appropriate source type and configure it.
- If you are using Data Graph personalization, select the relevant Data Graph and save your changes.
The available source types depend on your org and the content editor. A Data Graph can provide customer profile information and related data for personalization.
For example, if you want to personalize an email using a customer's first name, ensure that the relevant Data Graph is connected and the First Name attribute is available.
Step 2: Add Merge Fields to Your Email
Merge fields allow you to insert recipient-specific values into email content. They are useful for personalizing greetings, customer details, and other information that varies between recipients. For this example, we will personalize the greeting using the customer's first name.
How to insert a merge field
- Open your email in the editor.
- Add a text or paragraph component, or select an existing text component.
- Type Hello and place the cursor after the space.
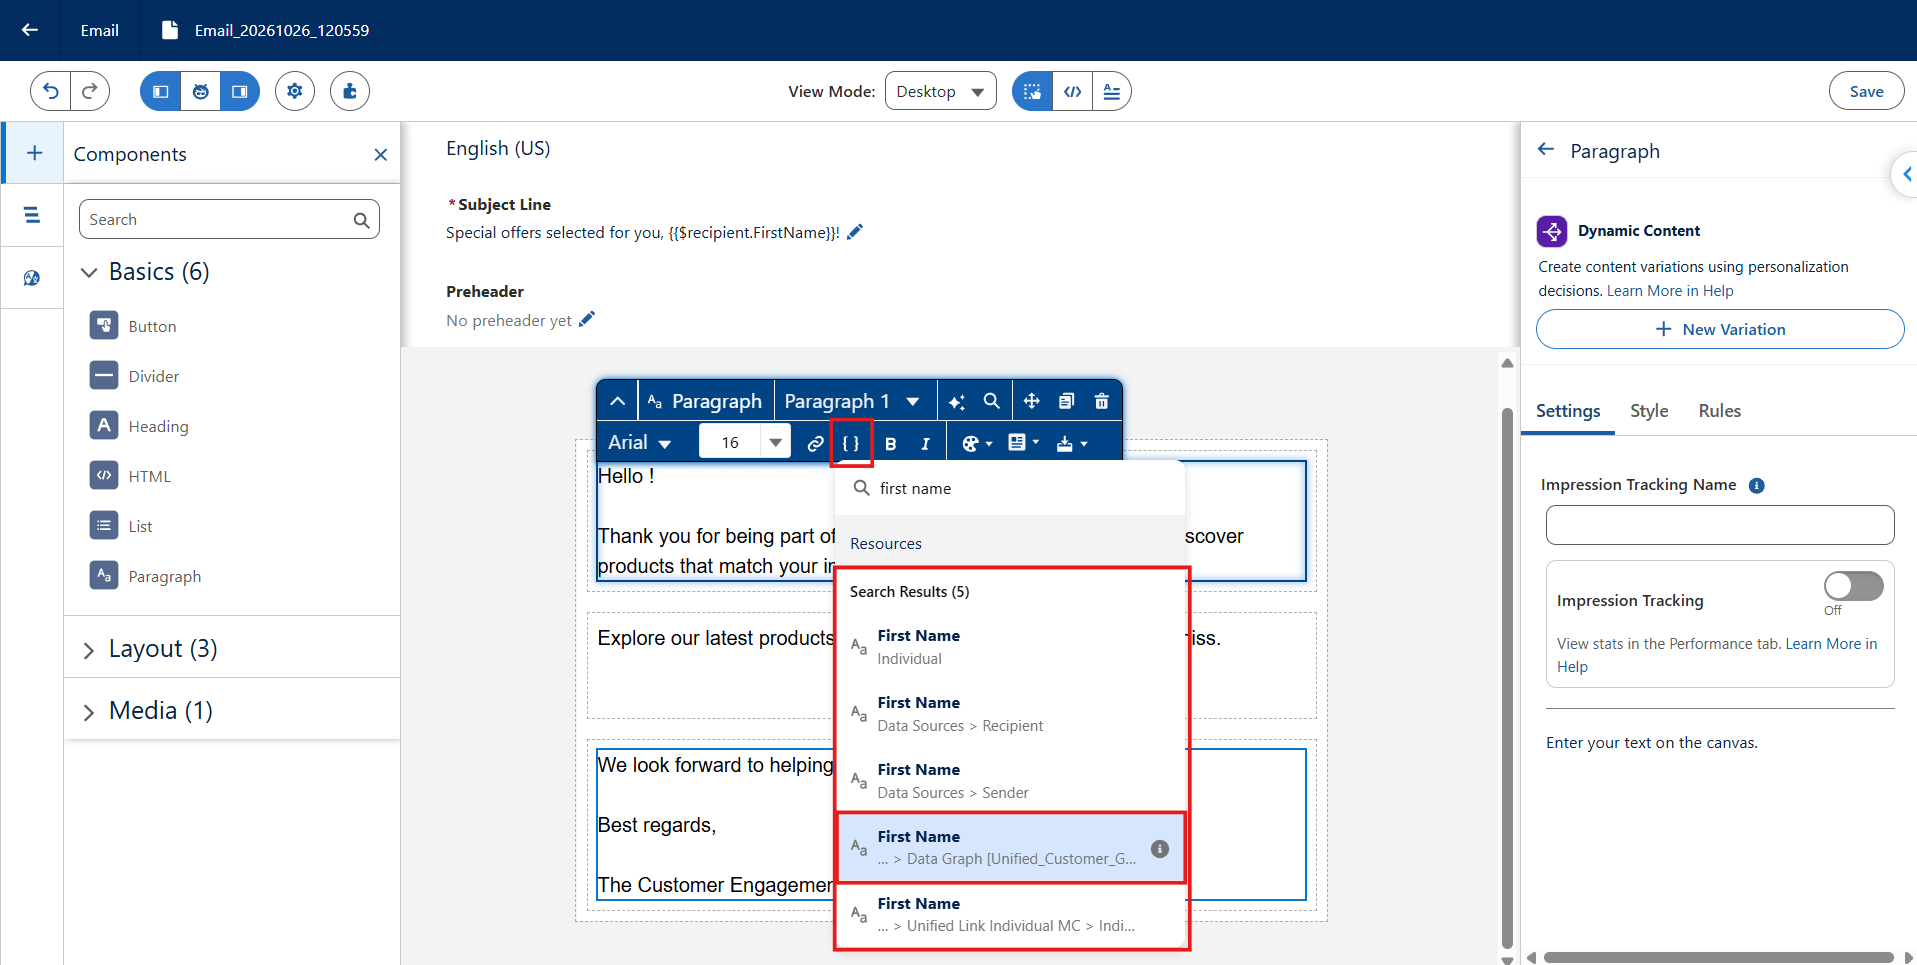
- In the text component's editing toolbar, click the Add Merge Field icon, represented by {} in the relevant editor experience.
- Select the appropriate data source, such as your configured Data Graph.
- Navigate to the relevant attribute. For example, select Primary Objects → First Name, if this path is available in your configuration.
- Click Done and save the email.
Your email will now contain a merge field that references the recipient's first name.
Example email content
Subject: Special Offers Selected for You!
Email body:
Hello, [First Name]!
Thank you for being part of our community. We have exciting products and offers waiting for you.
Explore our latest collection and find something that matches your interests.
CTA: Explore Offers
Note: [First Name] is a placeholder for this example. Insert the actual merge field using the email editor rather than typing the placeholder as plain text. When the email is processed for sending, the merge field resolves to the value available for the recipient.
Choosing the correct First Name field
You might notice that the merge-field selector displays multiple First Name options from different objects.
These options can appear because the Data Graph contains multiple related objects with their own fields. Choose the field that corresponds to the data you intend to use. The Recipient object may also be available and can contain values associated with the recipient when the email is used in a supported sending context.
Before selecting a field, consider where its value originates and whether it will be populated in the sending scenario. Testing the email with an appropriate recipient helps confirm that the correct value is displayed.
Step 3: Understand Content Variables
In the Data Sources panel, the Content Variables section may initially display the following message:
“Ahh, a clean slate. No variables added yet.”
This indicates that no content variables have been added to the email.
Content Variables are placeholders that can receive values from a supported process at runtime. They are useful when information needs to be supplied dynamically rather than retrieved solely from a fixed value in the email.
For example, a Salesforce Flow could supply a promotional code that should appear in an email sent through a supported process.
Consider the following examples:
| Content variable | Example value | Purpose |
| FirstName | Rahul | Personalize the greeting |
| PromoCode | SAVE20 | Display a promotional code |
| OfferDate | 30 November 2026 | Display an offer date |
| DiscountPercentage | 20 | Display a discount value |
These are illustrative names and values, not predefined fields.
How to add Content Variables
- Open the email editor.
- Select the Data Sources tab.
- Expand Content Variables.
- Click Add Content Variables.
- Configure the variable's name and supported data type.
- Save the variable.
- Configure the supported personalization mechanism to use the variable.
- If a Salesforce Flow supplies the value, configure the Flow to populate the corresponding variable through the supported integration.
Supported Content Variable Types
Depending on the supported configuration, content variables can use data types such as:
- Boolean
- Text
- Date
- DateTime
- Number
- Record
Choose the type that matches the value you expect the variable to receive.
When should you use Content Variables?
Use Content Variables when a supported process needs to pass information into your email dynamically.
For example, a Salesforce Flow could pass a promotional code to an email so that the message displays the code associated with that execution.
Content Variables and merge fields serve different purposes:
- Merge fields reference values from configured data sources.
- Content Variables provide placeholders for values supplied by a supported process at runtime.
Both can support personalization, but the right approach depends on where the data originates and how it is supplied.
Step 4: Understand Data Sources
The Data Sources section defines where your email can retrieve information for personalization.
For example, a Data Graph can provide customer profile information and related records. Other supported source types can expose fields or values for use in the email editor.
The availability and behavior of these source types depend on your Marketing Cloud Next configuration and the content editor.
Example: Use a Data Graph to personalize an email
Suppose you want to display a customer's first name in the greeting.
- Add the required Data Graph under Data Sources.
- Select a text component in the email.
- Click the merge-field icon.
- Select the Data Graph as the source.
- Navigate to the First Name attribute.
- Insert the field and save your email.
You can then use other available attributes for personalization, provided they are included in the configured source and supported by the relevant feature.
Important: If you change a data source after using its attributes in merge fields, you may need to remove and recreate the affected merge fields. Configure and verify your data sources before adding many personalized fields.
Step 5: Understand Triggers
The Triggers section appears alongside Content Variables and Data Sources in the email editor.
Triggers are separate from the data sources used to retrieve customer information and the variables used to pass values into content. Their exact purpose and configuration depend on the Marketing Cloud Next editor and feature being used.
In an event-driven marketing scenario, for example, a customer action may be associated with a process that sends a relevant email. The process and its available context determine how the email is initiated and what information can be supplied. However, do not assume that adding a trigger automatically creates a dynamic-content variation or populates a merge field. Those capabilities depend on their own configurations.
To understand the available options in your org:
- Open the email editor.
- Select the Data Sources tab.
- Expand Triggers.
- Review the available options and any required configuration.
- Test the resulting behavior using the supported preview or sending workflow.
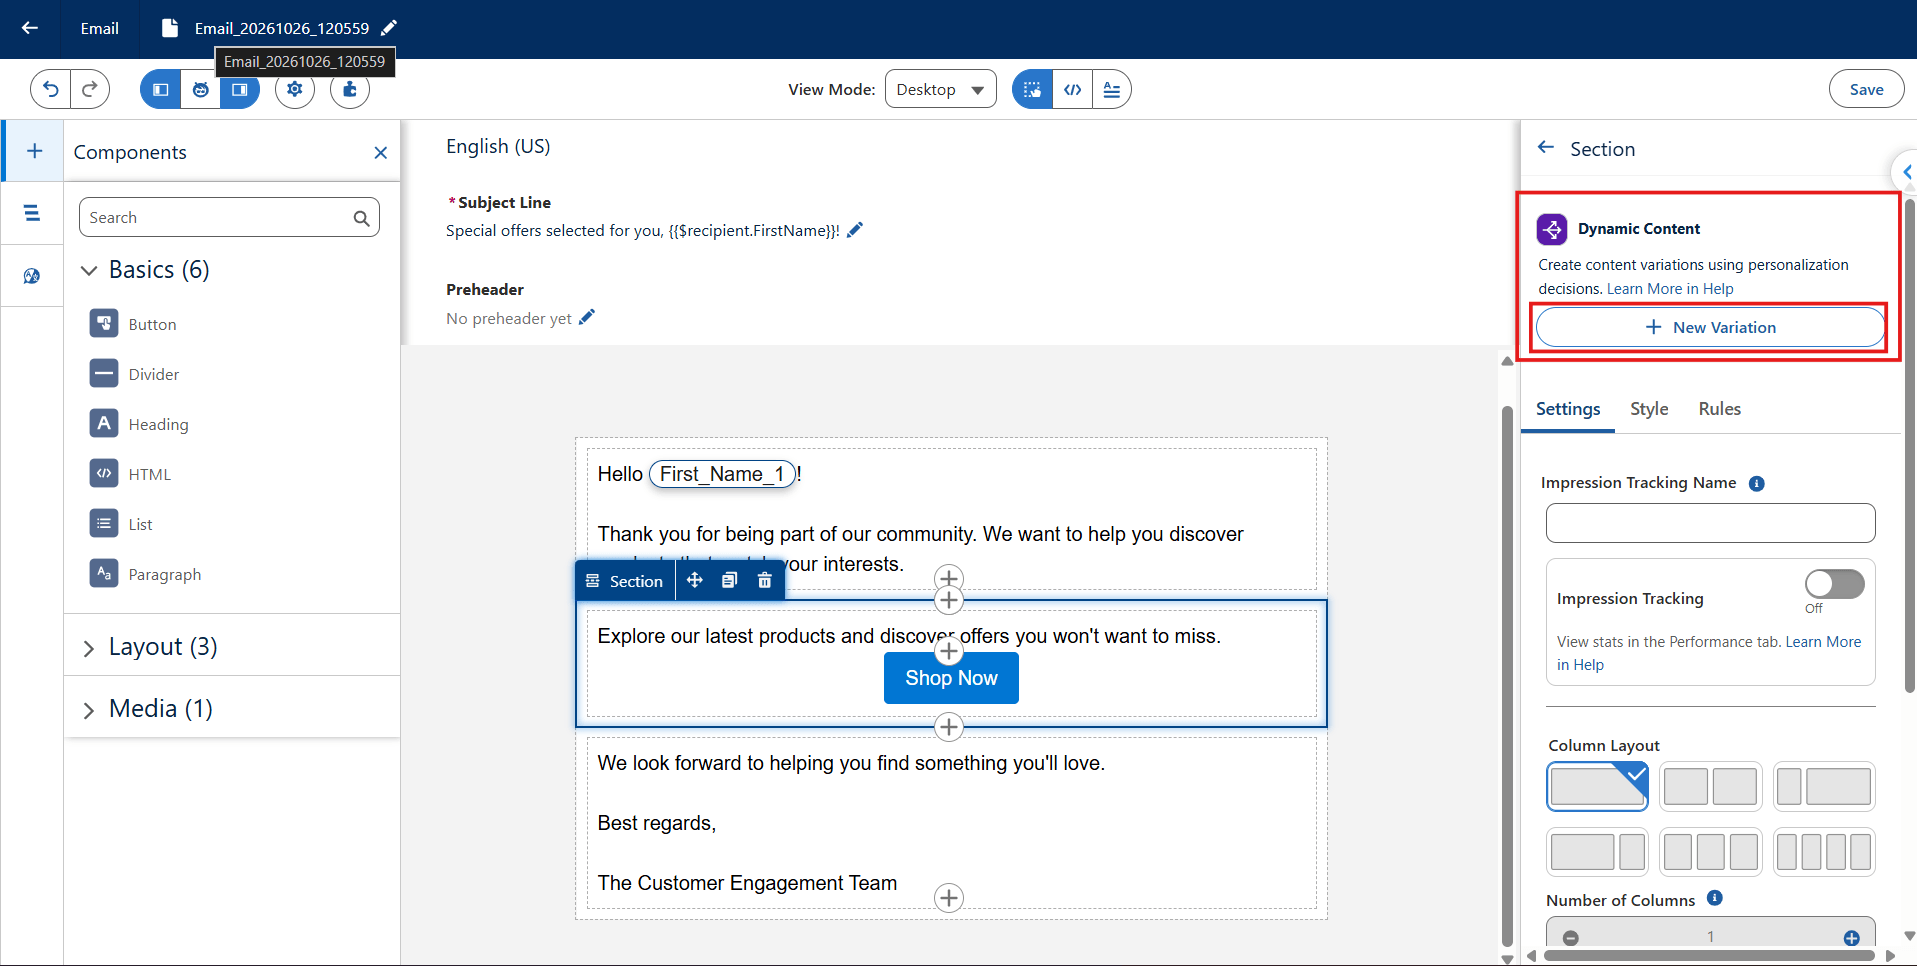
Step 6: Configure Dynamic Content Variations
Once the required data sources are connected, you can configure dynamic content to display different messages to different audiences.
For example, suppose a company wants to send a promotional email to existing customers and new prospects.
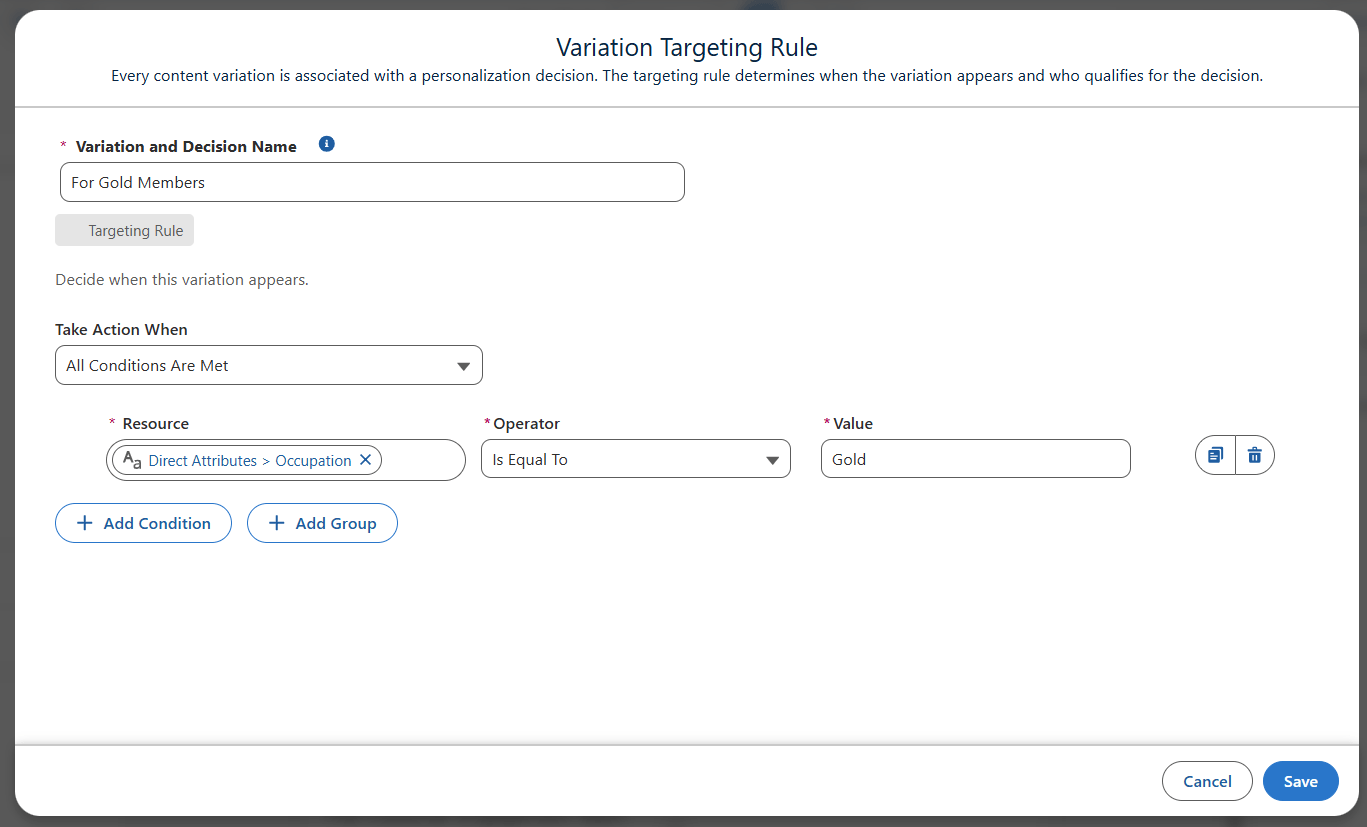
Select a supported content component in the email editor and create the variations required for your use case. Configure the conditions using attributes available through your personalization data source.
Consider the following example:
| Variation | Targeting condition | Content displayed |
| Existing customers | Customer category matches Existing Customer | Welcome back! Explore exclusive offers. |
| New prospects | Customer category matches Prospect | Welcome! Discover our latest products. |
| Default | No variation rule matches | Explore our latest products and offers. |
These conditions are illustrative. The actual targeting attributes must exist in your configured data source, and the values must match the customer data.
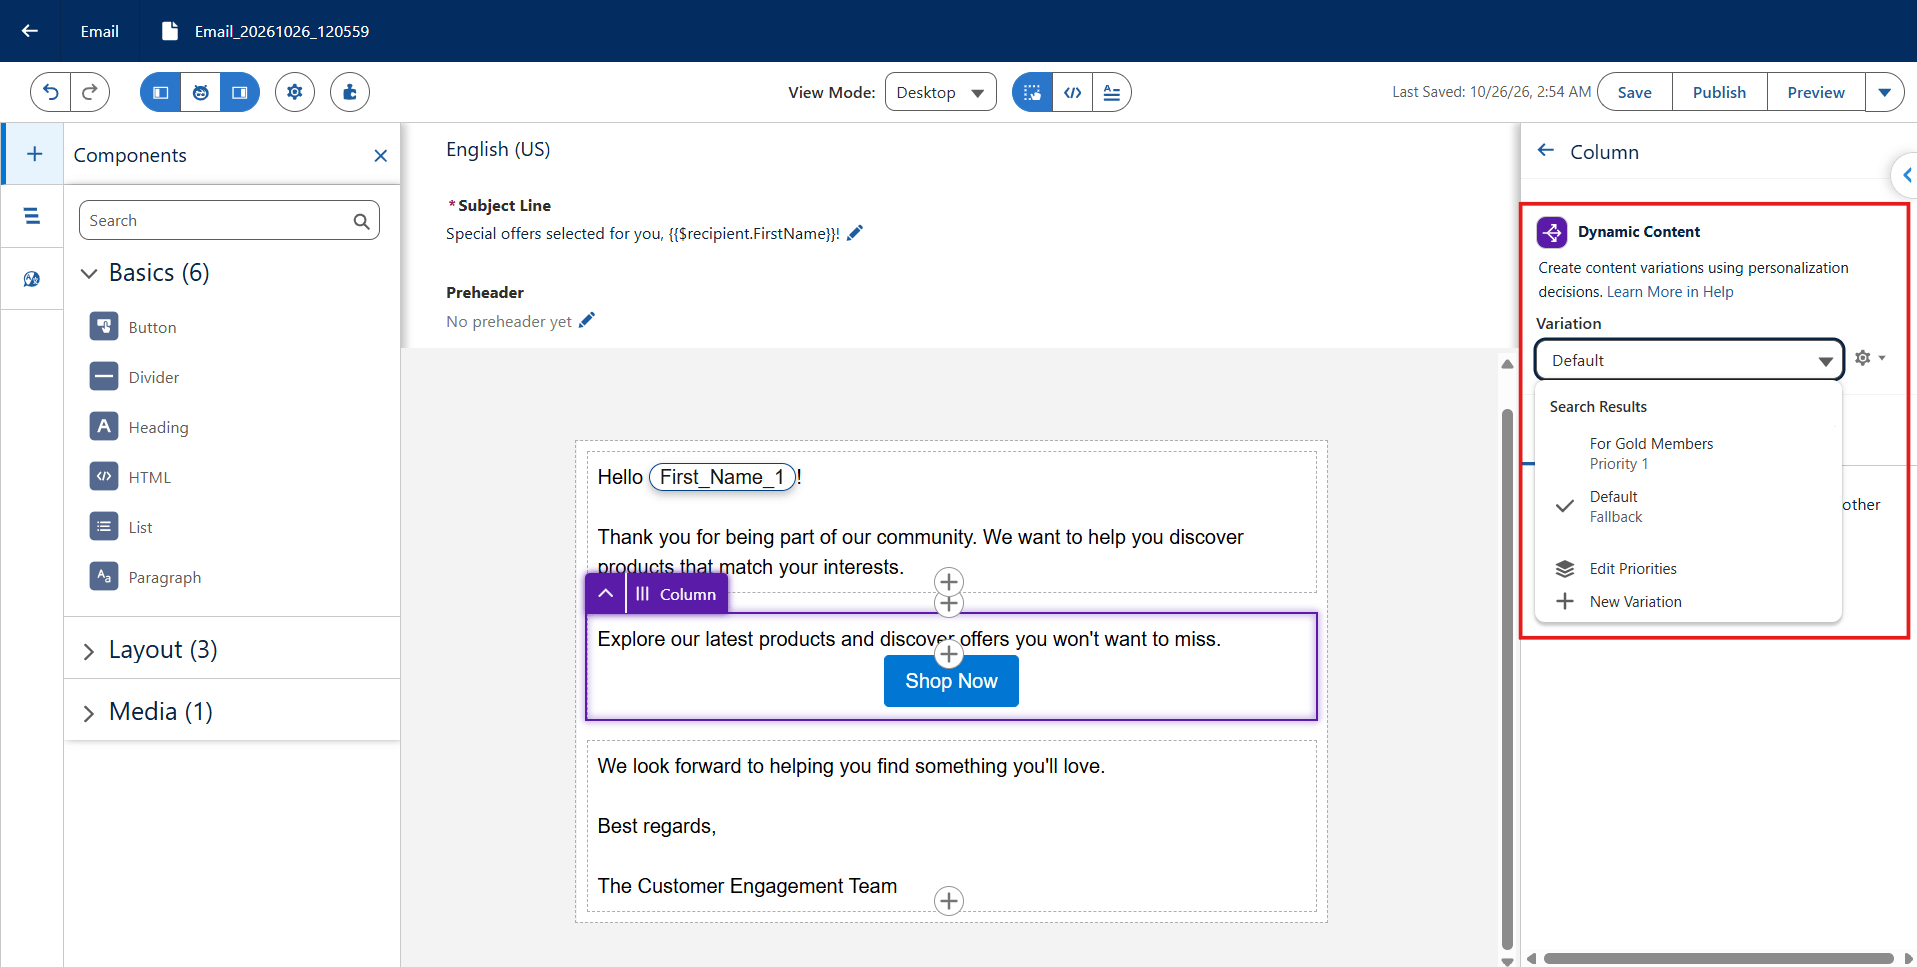
You can add more variations when required to support additional audiences. If no variation matches the recipient, the default content is displayed.
Step 7: Preview and Test the Email
Before sending your email, test the merge fields, content variables, data sources, and dynamic-content rules.
Verify that:
- The first-name merge field displays the expected value.
- Configured fallback text appears when a value is unavailable, where supported.
- Content variables receive the expected values from their configured source.
- The Data Graph provides the required attributes.
- Each variation displays the intended content.
- Default content appears when no targeting rule matches.
Important Notes and Limitations
Keep the following points in mind when configuring personalization:
- Personalization points: A single email or landing page can support up to 25 personalization points.
- Variations per component: Each component can support up to 15 variations.
- Content import and export: Content containing variations may have limitations with standard import/export workflows. Verify the behavior in your current release before moving content between environments.
- Merge-field data types: Verify the supported data types for the particular personalization feature being used.
- Data Graph configuration: Creating a Data Graph alone does not guarantee that dynamic variations will be available. Complete the required Personalization setup and verify permissions and component support.
Confirm feature limits and behavior against the Salesforce documentation for your specific org and release.
Best Practices for Email Personalization
- Start with a clear personalization goal.
- Use accurate and relevant customer data.
- Configure the required data sources before inserting merge fields.
- Keep targeting rules simple and understandable.
- Provide appropriate default content.
- Test merge fields, content variables, and variations before sending.
- Avoid unnecessary variations that make content difficult to maintain.
- Monitor email engagement and refine your personalization strategy over time.
Conclusion
Personalization in Salesforce Marketing Cloud Next helps marketers create more relevant email experiences by combining customer data, merge fields, content variables, and dynamic content.
The process begins with configuring Personalization and preparing the required Data Graph. Once the data is available, merge fields can insert customer-specific information, content variables can receive values from supported processes, and dynamic-content variations can display different messages based on configured conditions.
Understanding the roles of Content Variables, Data Sources, and Triggers makes it easier to configure the email correctly and troubleshoot issues during implementation.