In modern business workflows, sending timely, professional documents to clients is critical for closing deals and managing accounts. Whether it is an invoice, a service agreement, or a custom sales quote, sales teams often need to convert live CRM data into clean, branded PDF documents at the click of a button.
While third-party document generation tools exist on the AppExchange, Salesforce provides native capabilities to build fully customized PDFs without additional licensing costs. In this tutorial, we will walk through a common real-world business use case: generating a branded Sales Invoice PDF from an Opportunity record, complete with dynamic Opportunity Line Items (products), customer details, and custom styling.
Real-World Business Scenario
Imagine a sales representative at your company who has just moved an Opportunity to the "Closed Won" stage.
Before handing the deal over to fulfillment, the rep needs to send a formal PDF invoice to the client that includes:
- Header Details: Company logo, invoice number, and current date.
- Account & Contact Info: Customer name, billing address, and contact details.
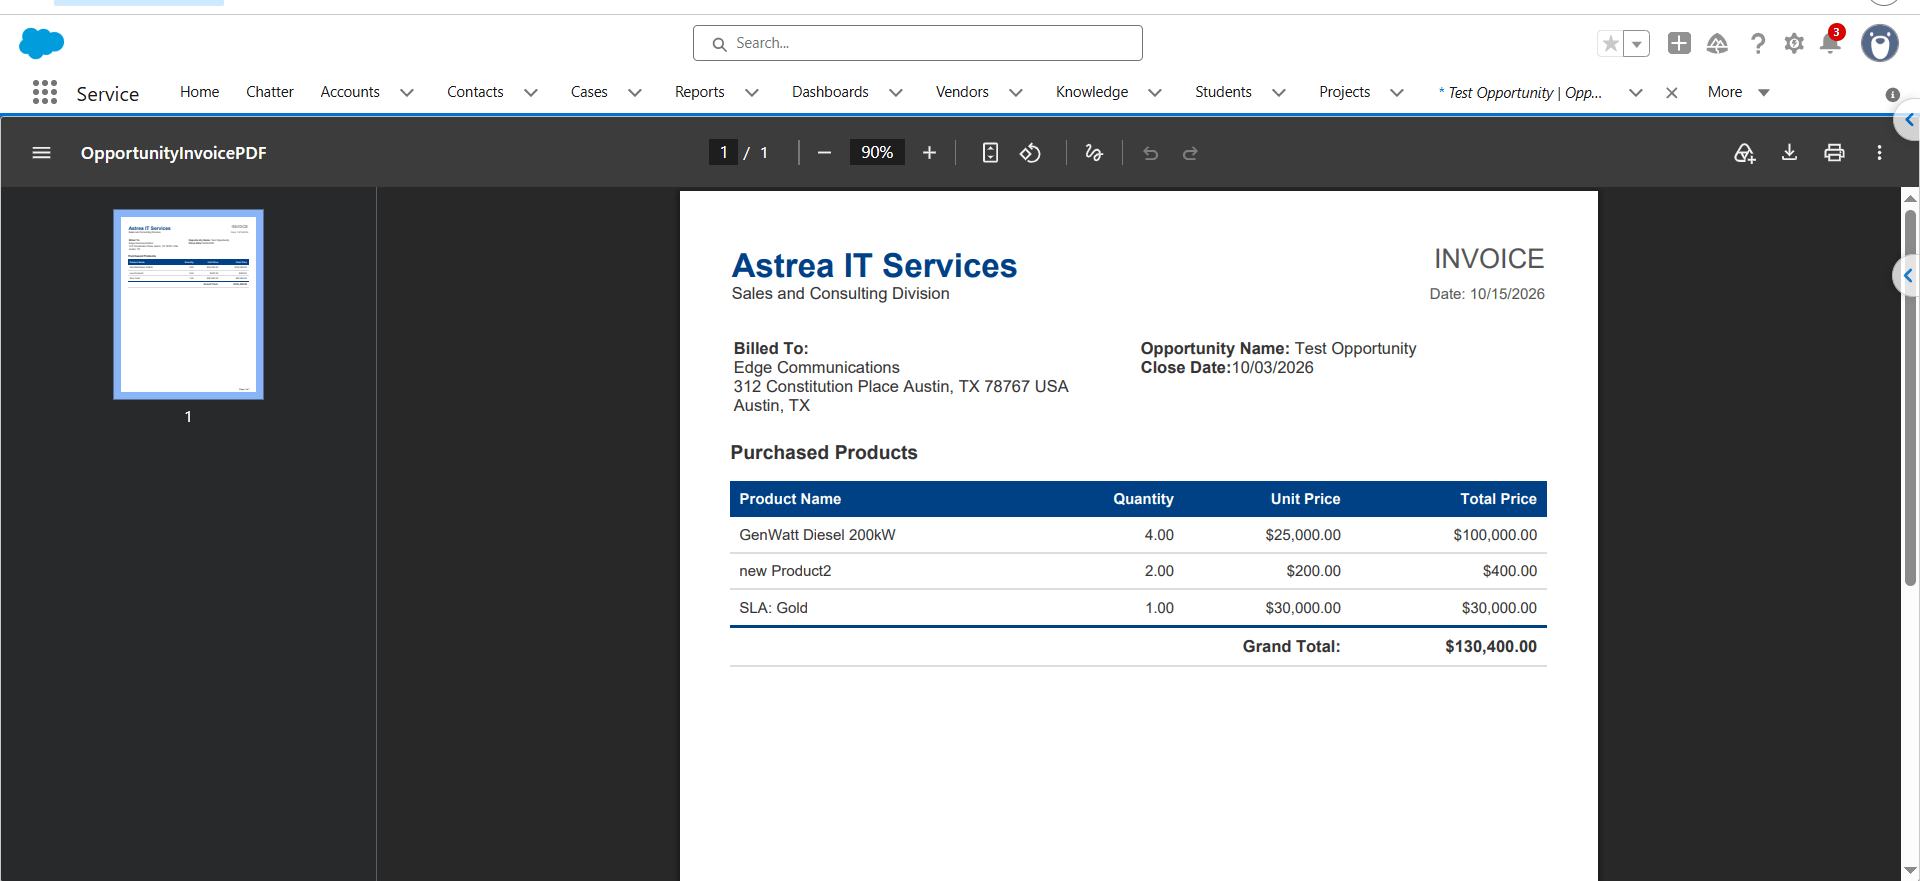
- Line Items Table: A detailed list of purchased products, quantities, unit prices, and total amounts.
- Summary Breakdown: Subtotal, discount applied, and final total.
Using an Apex Extension Controller and a Visualforce page with renderAs="pdf", we will build a solution that automatically pulls this data into a formatted, print-ready document.
Prerequisites
Before starting, make sure you have:
- A Salesforce Developer Edition org or Sandbox environment.
- Access to the Opportunity and Account objects.
- Access to Opportunity Products (Opportunity Line Items).
- Appropriate permissions to create Apex classes, Visualforce pages, and custom buttons.
- Permission set or profile with Customize Application.
- An Opportunity record with an associated Account and at least one product.
Step-by-Step Implementation Guide
Step 1: Create the Custom Apex Controller Extension
The first step is to create an Apex class that retrieves the information required for the invoice.
The controller extension will:
- Get the current Opportunity ID from the Visualforce page.
- Retrieve Opportunity details and related Account billing information.
- Query the products associated with the Opportunity.
- Calculate the grand total of the line items.
How to create the class:
- Open Salesforce and launch Developer Console.
- Select File → New → Apex Class.
- Enter OpportunityInvoiceController as the class name.
- Add the following code and save the class.
public with sharing class OpportunityInvoiceController {

    public Opportunity opportunityRecord { get; private set; }
    public List lineItems { get; private set; }
    public Decimal grandTotal { get; private set; }

    public OpportunityInvoiceController(ApexPages.StandardController stdController) {
        // Fetch current Opportunity ID from the page context
        Id oppId = stdController.getId();

        if (oppId != null) {
            // Query Opportunity details with related Account information
            opportunityRecord = [
                SELECT Id, Name, Account.Name, Account.BillingStreet,
                       Account.BillingCity, Account.BillingState,
                       Account.BillingPostalCode, CloseDate, Amount
                FROM Opportunity
                WHERE Id = :oppId
                LIMIT 1
            ];

            // Query line items associated with this Opportunity
            lineItems = [
                SELECT Id, Product2.Name, Quantity, UnitPrice, TotalPrice
                FROM OpportunityLineItem
                WHERE OpportunityId = :oppId
            ];

            // Calculate grand total
            grandTotal = 0;
            for (OpportunityLineItem item : lineItems) {
                grandTotal += item.TotalPrice;
            }
        }
    }
}
Step 2: Create the Visualforce Page for PDF Rendering
After creating the Apex controller, the next step is to create a Visualforce page that presents the retrieved information in an invoice format.
We will use renderAs="pdf" to tell Salesforce to render the page as a PDF document. HTML tables will organize the invoice information, while CSS will control the font, spacing, colors, and table borders.
How to create the Visualforce page
- In Developer Console, select File → New → Visualforce Page.
- Enter OpportunityInvoicePDF as the page name.
- Replace the default markup with the following code.
- Save the page.
<apex:page standardController="Opportunity"
           extensions="OpportunityInvoiceController"
           renderAs="pdf"
           applyHtmlTag="false"
           showHeader="false"
           sidebar="false">

    <html>
        <head>
            <style type="text/css">
                @page {
                    size: letter;
                    margin: 10mm;
                    @bottom-right {
                        content: "Page " counter(page) " of " counter(pages);
                        font-family: sans-serif;
                        font-size: 9pt;
                    }
                }

                body {
                    font-family: Arial, Helvetica, sans-serif;
                    font-size: 11pt;
                    color: #333333;
                }

                .header-table {
                    width: 100%;
                    border-collapse: collapse;
                    margin-bottom: 25px;
                }

                .company-title {
                    font-size: 22pt;
                    font-weight: bold;
                    color: #004085;
                }

                .invoice-title {
                    font-size: 18pt;
                    text-align: right;
                    color: #555555;
                }

                .details-table {
                    width: 100%;
                    margin-bottom: 20px;
                }

                .items-table {
                    width: 100%;
                    border-collapse: collapse;
                    margin-top: 15px;
                }

                .items-table th {
                    background-color: #004085;
                    color: #ffffff;
                    padding: 8px;
                    text-align: left;
                    font-size: 10pt;
                }

                .items-table td {
                    border-bottom: 1px solid #dddddd;
                    padding: 8px;
                    font-size: 10pt;
                }

                .total-row td {
                    font-weight: bold;
                    border-top: 2px solid #004085;
                    font-size: 11pt;
                }
            </style>
        </head>

        <body>
            <!-- Header Section -->
            <table class="header-table">
                <tr>
                    <td>
                        <span class="company-title">Astrea IT Services</span><br/>
                        Sales and Consulting Division
                    </td>
                    <td class="invoice-title">
                        INVOICE<br/>
                        <span style="font-size: 10pt;">Date: {!MONTH(TODAY())}/{!DAY(TODAY())}/{!YEAR(TODAY())}</span>
                    </td>
                </tr>
            </table>

            <!-- Account & Opportunity Details -->
<table class="details-table">
<tr>
    <td width="50%" valign="top">
        <strong>Billed To:</strong><br/>
        {!opportunityRecord.Account.Name}<br/>
        {!opportunityRecord.Account.BillingStreet}<br/>
        {!opportunityRecord.Account.BillingCity},
  {!opportunityRecord.Account.BillingState} {!opportunityRecord.Account.BillingPostalCode}
    </td>
    <td width="50%" valign="top">
        <strong>Opportunity Name:</strong>

        {!opportunityRecord.Name}<br/>
        <strong>Close Date:</strong>
        <apex:outputText value="{0,date,MM/dd/yyyy}">
            <apex:param value="{!opportunityRecord.CloseDate}" />
        </apex:outputText>
    </td>
</tr>
</table>

            <!-- Products Table -->
            <h3>Purchased Products</h3>
            <table class="items-table">
                <thead>
                    <tr>
                        <th>Product Name</th>
                        <th style="text-align: right;">Quantity</th>
                        <th style="text-align: right;">Unit Price</th>
                        <th style="text-align: right;">Total Price</th>
                    </tr>
                </thead>
                <tbody>
                    <apex:repeat value="{!lineItems}" var="item">
                        <tr>
                            <td>{!item.Product2.Name}</td>
                            <td style="text-align: right;">{!item.Quantity}</td>
                            <td style="text-align: right;">
                                <apex:outputText value="{0, number, $#,##0.00}">
                                    <apex:param value="{!item.UnitPrice}" />
                                </apex:outputText>
                            </td>
                            <td style="text-align: right;">
                                <apex:outputText value="{0, number, $#,##0.00}">
                                    <apex:param value="{!item.TotalPrice}" />
                                </apex:outputText>
                            </td>
                        </tr>
                    </apex:repeat>
                    <tr class="total-row">
                        <td colspan="3" style="text-align: right;">Grand Total:</td>
                        <td style="text-align: right;">
                            <apex:outputText value="{0, number, $#,##0.00}">
                                <apex:param value="{!grandTotal}" />
                            </apex:outputText>
                        </td>
                    </tr>
                </tbody>
            </table>
        </body>
    </html>
</apex:page>
Step 3: Add a Custom Button to the Opportunity Page Layout
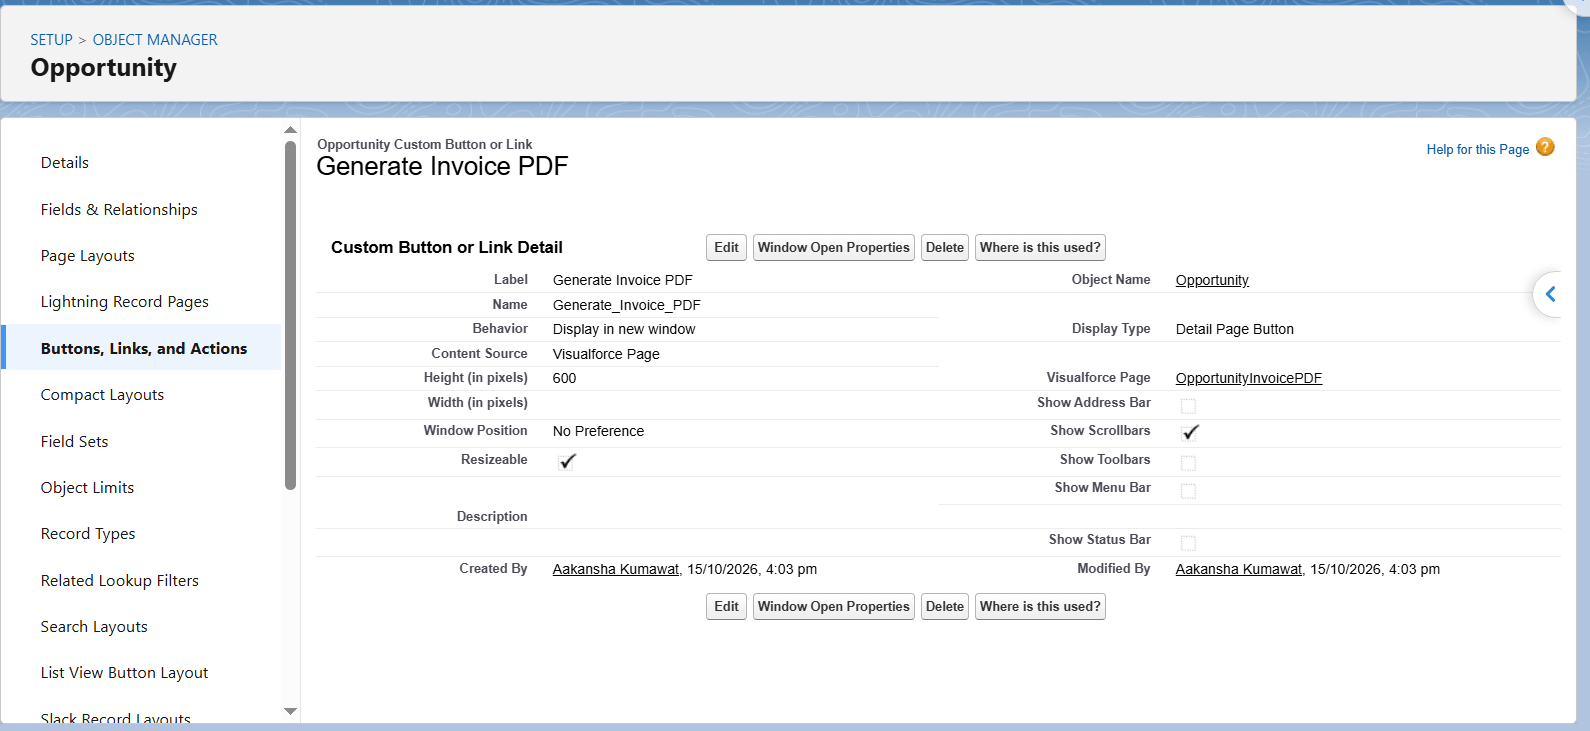
Once the controller and Visualforce page are ready, create a button that allows sales representatives to generate the invoice directly from an Opportunity record.
Configuration steps
- Go to Setup → Object Manager → Opportunity.
- Open Buttons, Links, and Actions.
- Click New Button or Link.
- Configure the button as follows:
Setting Value Label Generate Invoice PDF Display Type Detail Page Button Behavior Display in new window Content Source Visualforce Page Visualforce Page OpportunityInvoicePDF - Save the button.
- Open Page Layouts under the Opportunity object.
- Edit the relevant layout and drag the new button into the Salesforce Mobile and Lightning Experience Actions section or the appropriate custom button area, depending on your page configuration.
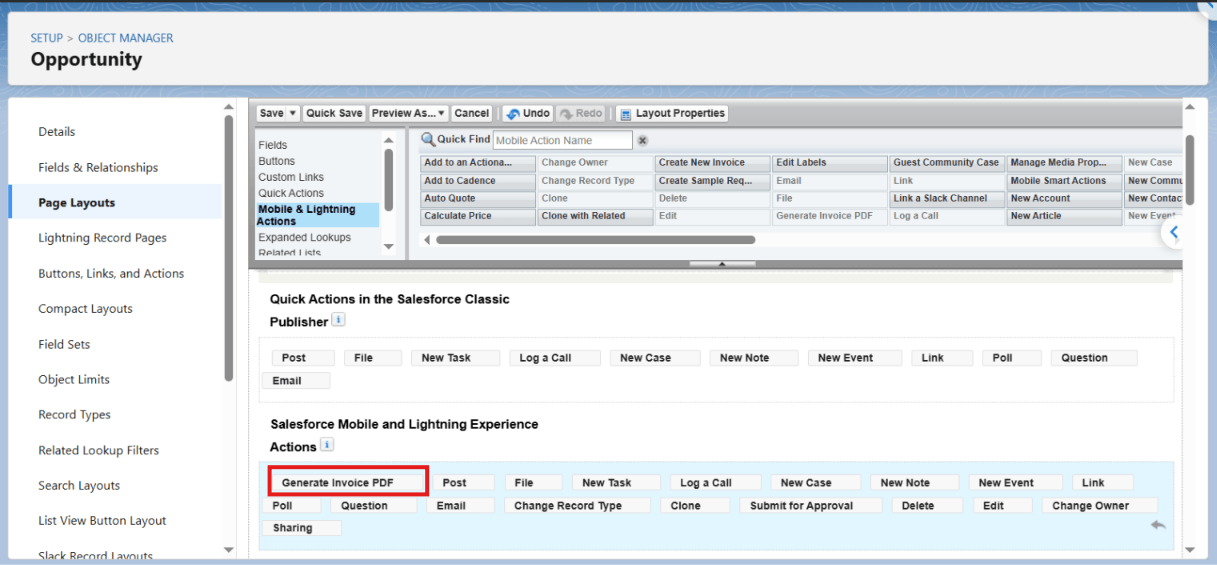
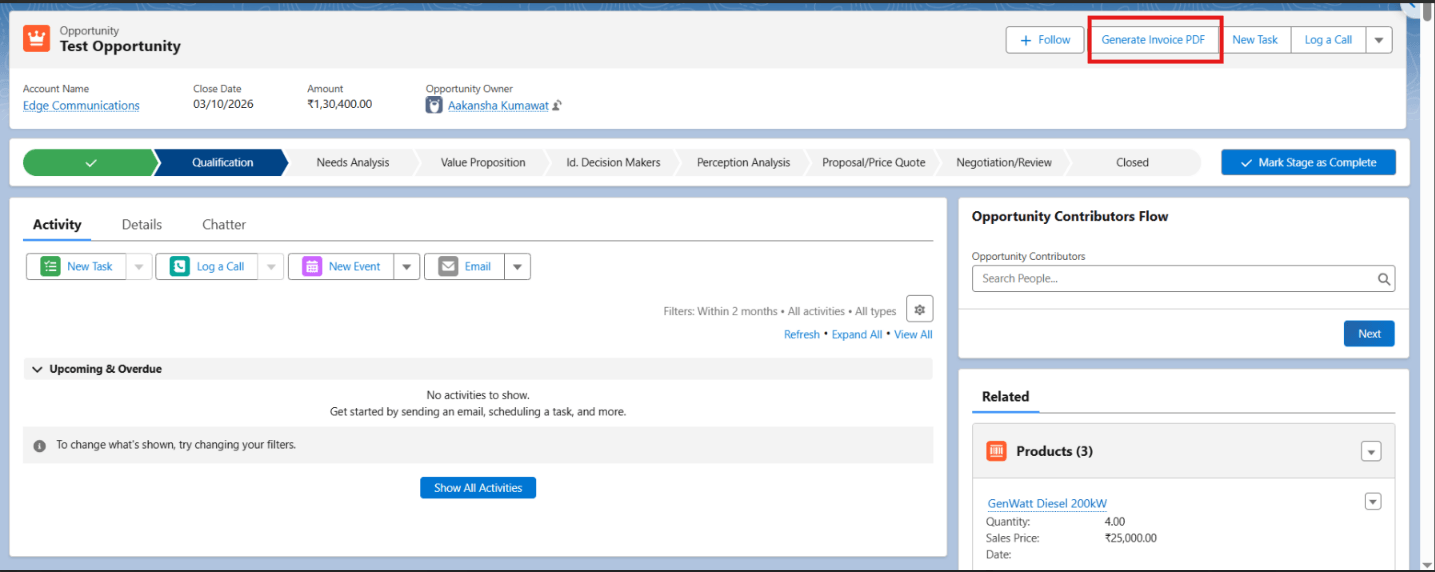
- Save the layout and open an Opportunity record to verify that the button is available.
Step 4: Generate and verify the invoice PDF
Now that all three components are configured, it is time to test the solution.
Testing procedure
- Open an Opportunity record that has an associated Account.
- Ensure the Opportunity has one or more products added.
- Click Generate Invoice PDF.
Best Practices & Limitations
When rendering PDFs natively in Salesforce via Visualforce, keep the following considerations in mind:
| Consideration | Details & Solution |
|---|---|
| Supported CSS | The rendering engine uses Flying Saucer (CSS 2.1 subset). Advanced CSS3 features like Flexbox or Grid are not supported. Stick to CSS tables and standard block displays. |
| Fonts | Use standard web-safe fonts such as Arial, Helvetica, Times New Roman, or Courier. Custom web fonts (like Google Fonts) are not rendered reliably. |
| Page Break Control | Use CSS properties like page-break-inside: avoid; on rows or section blocks to prevent orphaned headings across pages. |
| Heap Limits | Large PDF files with thousands of records can exceed the Apex heap limit (12 MB async / 6 MB sync). Ensure SOQL queries filter records efficiently. |
Conclusion
Generating dynamic PDFs with Visualforce and Apex is a practical way to create customized business documents directly from Salesforce. By combining an Apex controller extension, a Visualforce page, and a custom Opportunity button, sales teams can generate invoices using existing CRM data without manually preparing each document.
The same approach can be extended to sales quotations, service agreements, order summaries, and other record-based documents.
With appropriate formatting, validation, and access controls, this solution can become a useful part of a Salesforce sales process.
If you're interested in exploring more Salesforce solutions, visit our Sales Cloud Page.