Introduction:
In the realm of customer service, delivering exceptional experiences and efficient support is paramount.
Salesforce Service Console. provides a powerful platform that empowers businesses to centralize and streamline their customer service operations. In this blog post, we will explore the purpose and benefits of the Service Console, highlight business scenarios where it proves helpful, and provide a step-by-step guide for setting up the Service Console.
The Service Console plays a foundational role in building a high-performing contact center. When integrated with broader Service Cloud capabilities such as Omni-Channel routing, knowledge management, and automation, organizations can create a fully optimized support ecosystem.
Understanding the Service Console:
The Service Console is a unified workspace within Salesforce that equips customer service agents with a comprehensive set of tools and features to handle customer inquiries, cases, and service requests. It provides a single, intuitive interface that brings together customer data, communication channels, and collaboration tools, enabling agents to deliver personalized and efficient support. Benefits of the Service Console:
- Enhanced Agent Productivity: The Service Console offers a consolidated view of customer information, case history, and relevant data from multiple systems. Agents can quickly access and update customer records, view related cases, and leverage knowledge articles to provide accurate and timely assistance. This leads to improved agent efficiency and reduced response times.
- Seamless Multi-Channel Support: The Service Console integrates various communication channels, such as email, phone, chat, and social media, into a unified interface. Agents can handle customer interactions across multiple channels without the need to switch between different applications or screens. This ensures consistent customer experiences and allows agents to manage and prioritize cases efficiently.
- Intelligent Case Routing and Assignment: With the Service Console, organizations can implement automated case routing and assignment rules based on predefined criteria such as skillset, workload, priority, or geography. This ensures that cases are routed to the most appropriate agents, improving efficiency and customer satisfaction.
- Collaborative Case Resolution: The Service Console enables real-time collaboration among agents, supervisors, and experts through features like Chatter, chat, and internal notes. Agents can seek guidance, share insights, and resolve complex cases faster by tapping into the collective knowledge of the team.
- Customizable and Scalable: The Service Console can be tailored to suit specific business requirements. Organizations can customize the console layout, create custom components, and add relevant apps and tools to meet the unique needs of their customer service operations. Furthermore, as the business evolves, the Service Console can easily scale to accommodate growing customer demands.
Business Scenarios Where the Service Console Proves Helpful:
- High-Volume Case Management: Organizations dealing with a large volume of customer cases benefit from the Service Console's streamlined case management capabilities. Agents can efficiently handle and prioritize cases, track case progress, and ensure timely resolutions.
- Complex Support Environments: Businesses offering complex products or services often face intricate customer queries. The Service Console provides a unified view of customer information, allowing agents to navigate through relevant data and provide accurate and personalized support.
- Multichannel Customer Interactions: With customers reaching out through various channels, the Service Console simplifies the process by consolidating all communication channels into one interface. Agents can seamlessly switch between channels, respond promptly, and maintain consistent customer experiences.
Setting up the Service Console:
Now, let's walk through the step-by-step process of setting up the Service Console in Salesforce:
Step 1: Enable the Service Console:
a. Login to Salesforce and navigate to Setup.
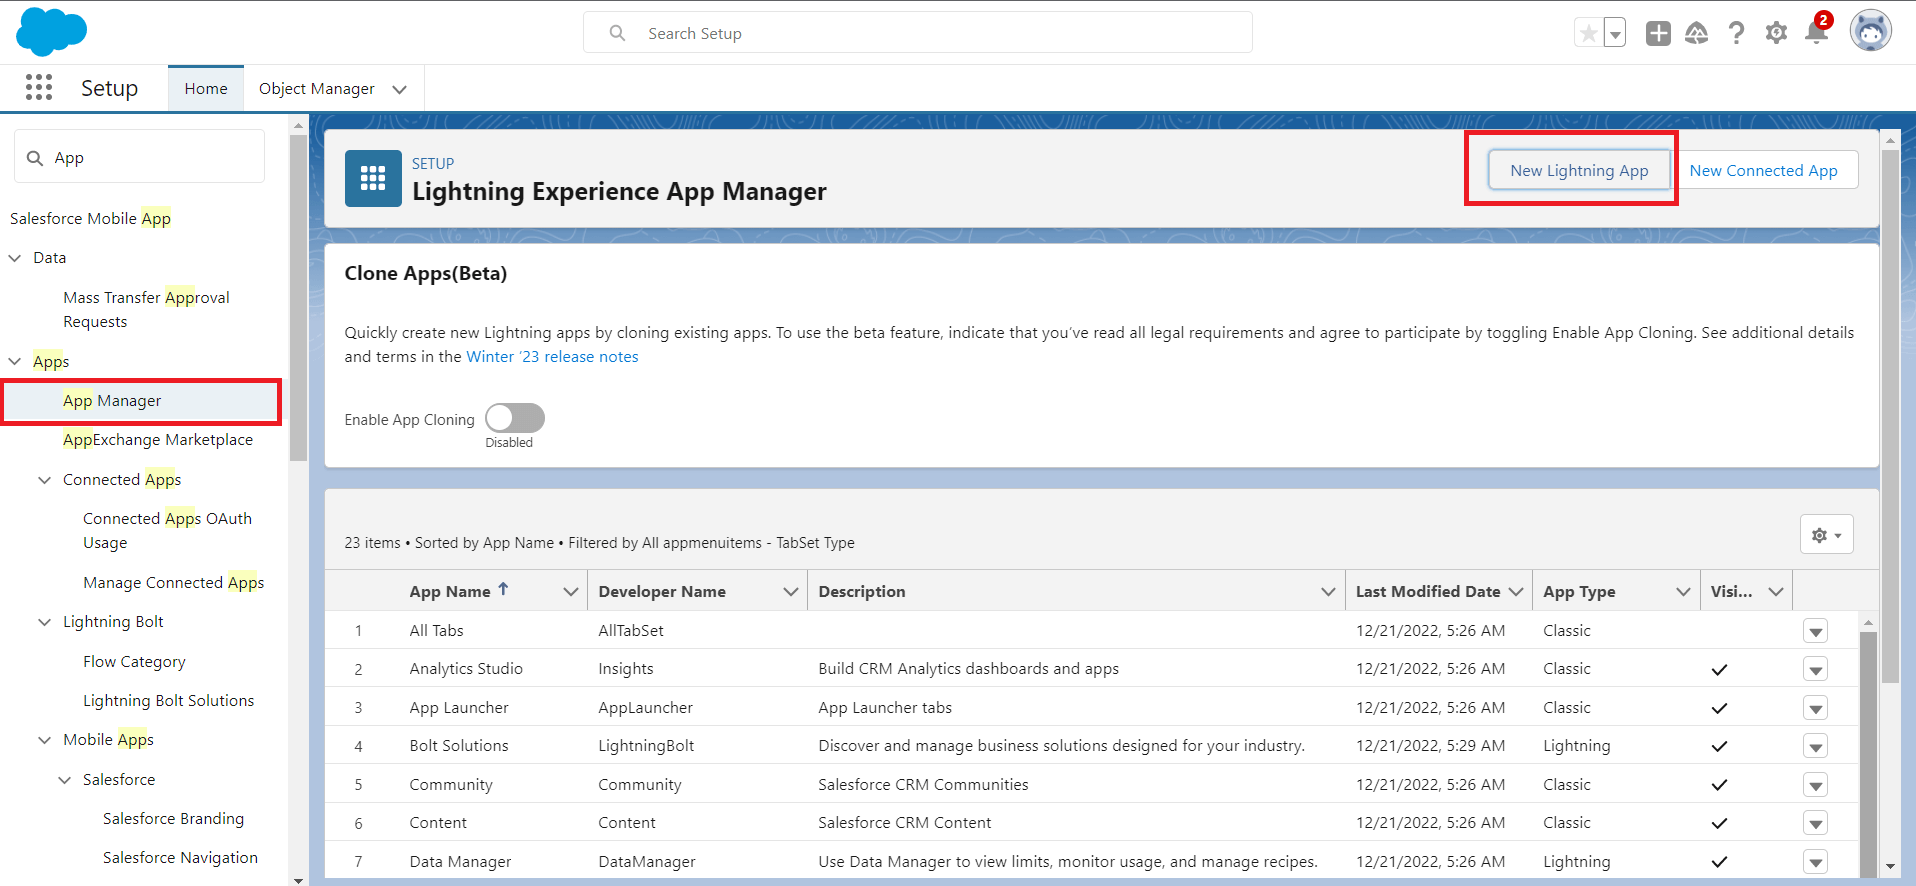
b. In the Quick Find box, search for "App Manager" and click on it.
c. Click on "New Lightning App" and select the "Service" template.
d. Follow the prompts to configure the app, including the app name, logo, and navigation items.
e. Save the app and assign it to the relevant profiles.
Step 2: Customize the Service Console Layout:
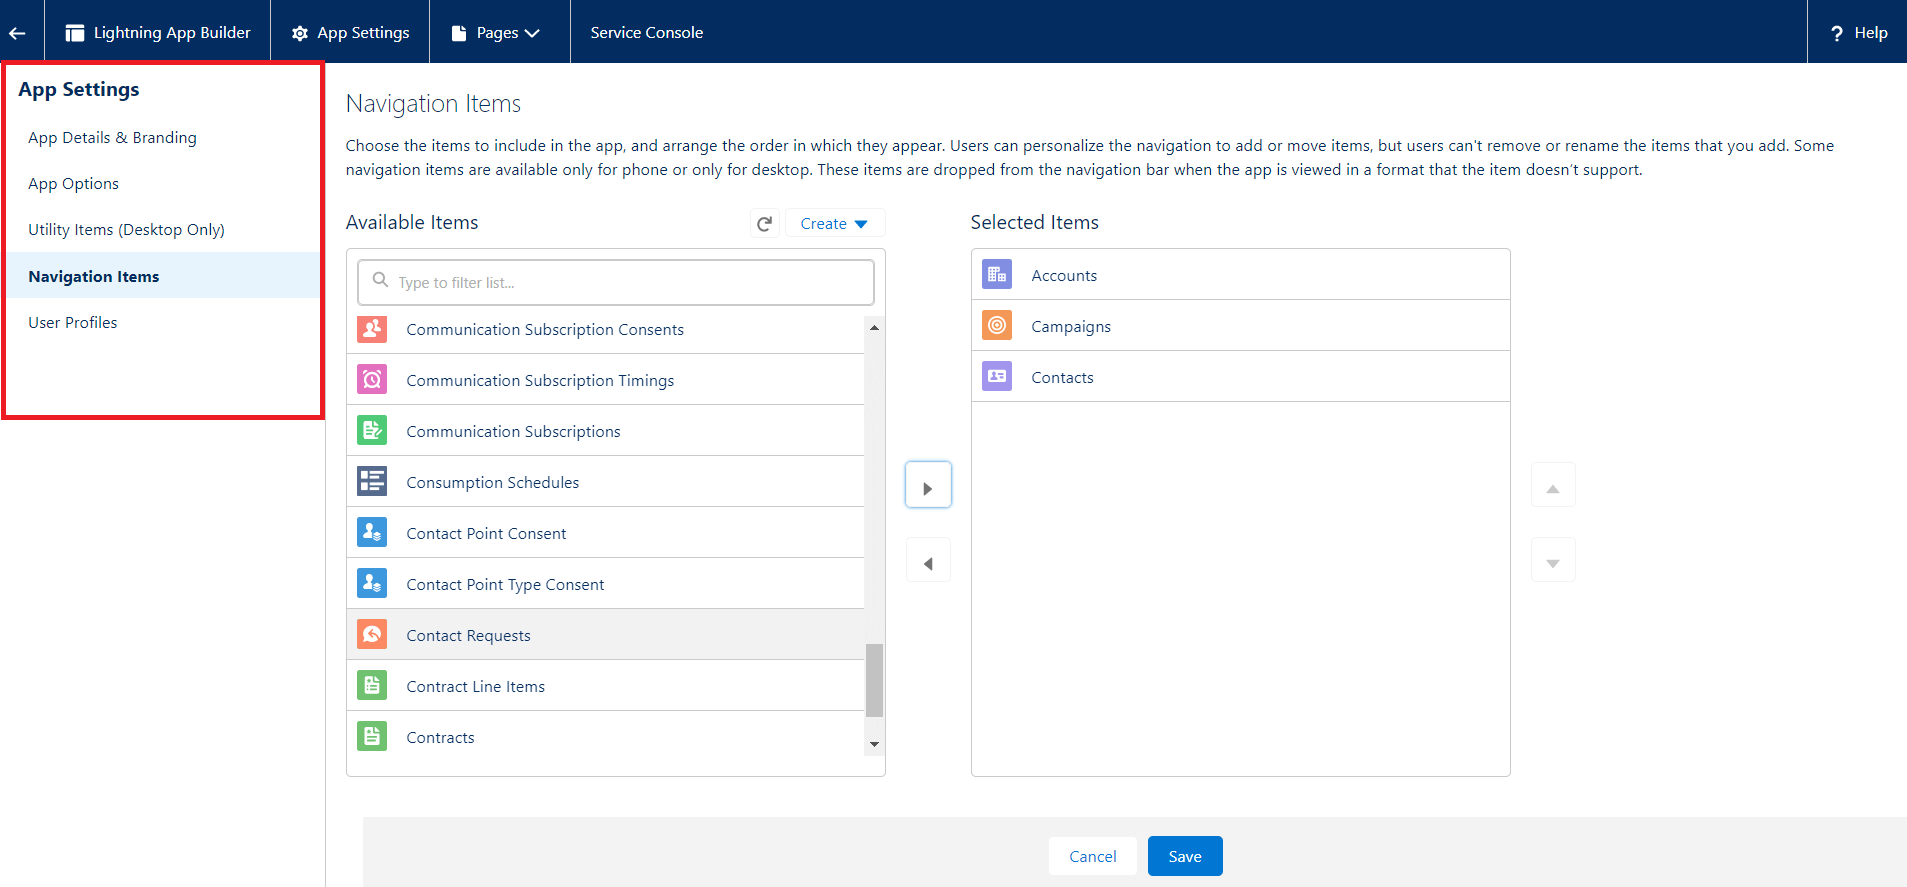
a. In Setup, search for "App Manager" and click on it.
b. Select the Service Console app you created and click on "Edit."
c. Customize the console layout by adding or removing components, rearranging them, and configuring their properties.
Step 3: Configure Case Assignment Rules:
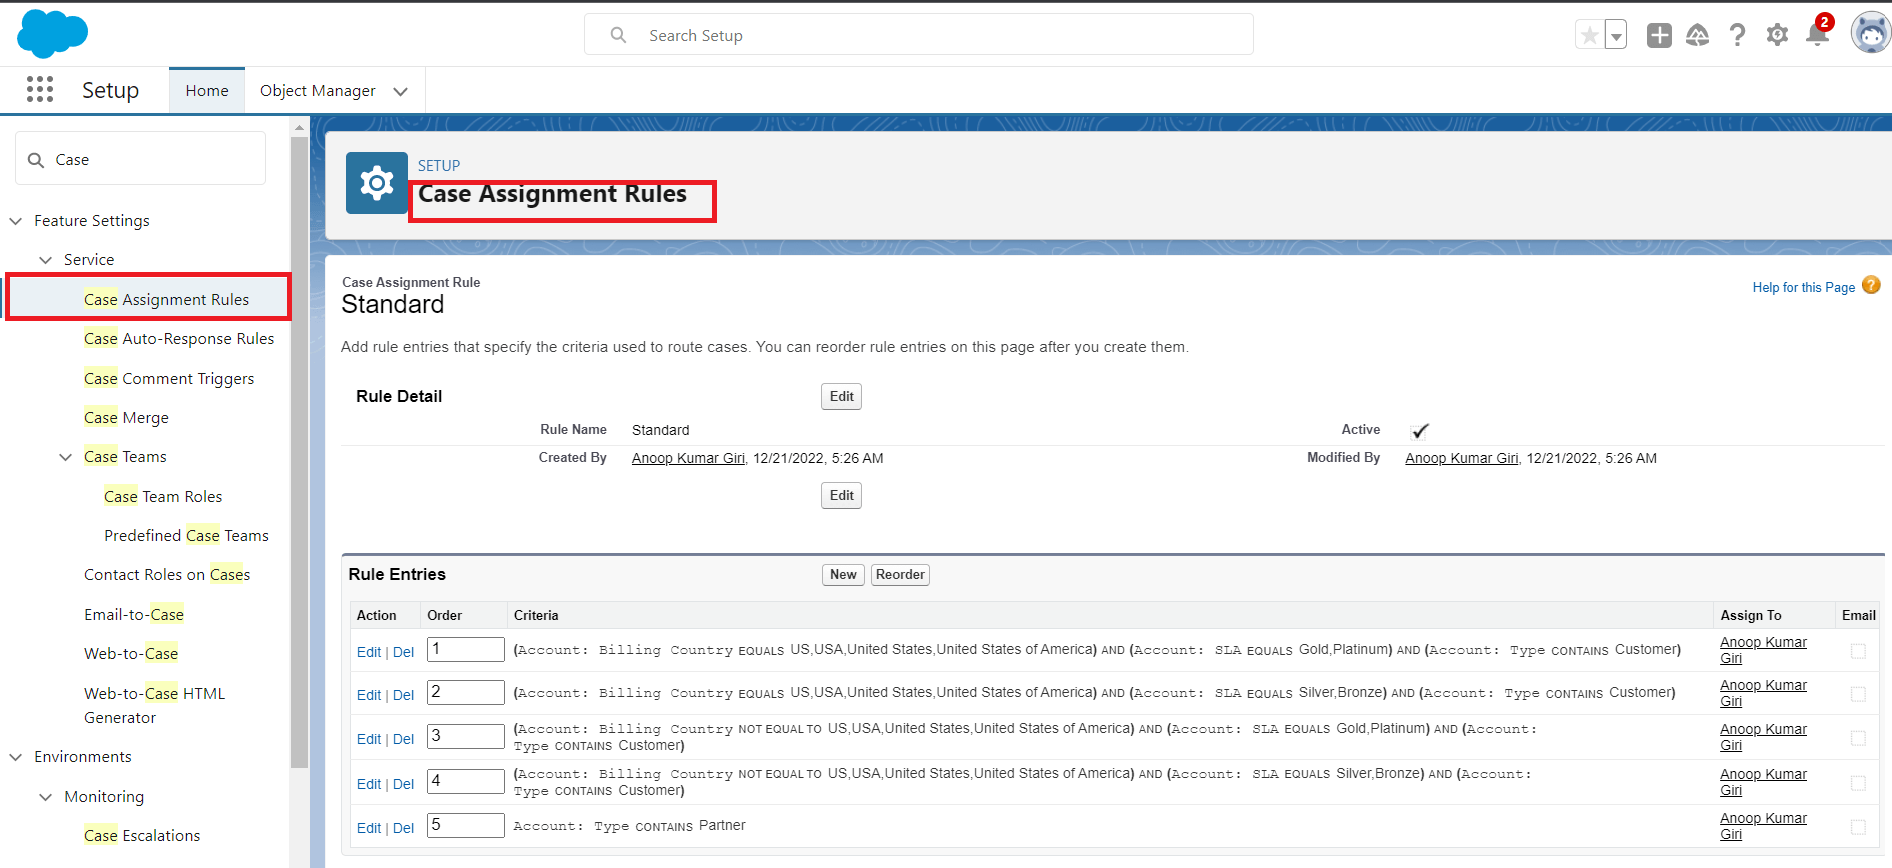
a. In Setup, search for "Case Assignment Rules" and click on it.
b. Define assignment rules to automatically route cases based on predefined criteria, such as case type or origin.
Step 4: Implement Collaboration Features:
a. Explore the collaboration tools available in the Service Console, such as Chatter ,Chate and Files.
b. Train agents on utilizing these features to enhance collaboration and knowledge sharing.

Step 5: Test and Iterate:
a. Test the Service Console setup with a sample case and gather feedback from agents.
b. Iterate and fine-tune the configuration based on user feedback to optimize the console's usability and effectiveness.
Conclusion:
Salesforce Service Console revolutionizes customer service by providing agents with a powerful and unified workspace to handle customer inquiries effectively. With enhanced productivity, seamless multi-channel support, intelligent case routing, and collaborative case resolution, the Service Console empowers businesses to deliver exceptional customer experiences. By following the step-by-step instructions provided, organizations can set up and customize the Service Console according to their specific needs, leading to streamlined customer service operations and improved customer satisfaction.
The Service Console is one of the core components of Salesforce Service Cloud, enabling intelligent case management, omnichannel support, automation, and AI-driven productivity enhancements. To explore more best practices, implementation strategies, and advanced Service Cloud capabilities, visit our Service Cloud page.