Introduction
Forms play an important role in collecting information from customers and potential leads. In Salesforce Marketing Cloud Next, Forms can capture customer information and connect form submissions with Salesforce automation.
For example, imagine a company wants to organize a webinar about Salesforce Agentforce. Instead of collecting registrations manually, the marketing team can create a form to collect the visitor's first name, last name, email address, and company name.
In this blog, we will explore how to create a Form in Marketing Cloud Next, connect it with a Flow, and understand where Forms can be used in real-world marketing scenarios.
Prerequisites
Before creating a Form, ensure the following requirements are met:
- Permission Set: Marketing Cloud Manager.
- Data Access: Required object, field, and record type permissions if you are using a Data Source.
- Flow Permissions: Access to create or edit and activate the required Flow.
- Publishing Access: The necessary permissions to publish the Form and landing page.
1. How to Create a Form in Marketing Cloud Next
Let's create a simple Form for our webinar registration use case.
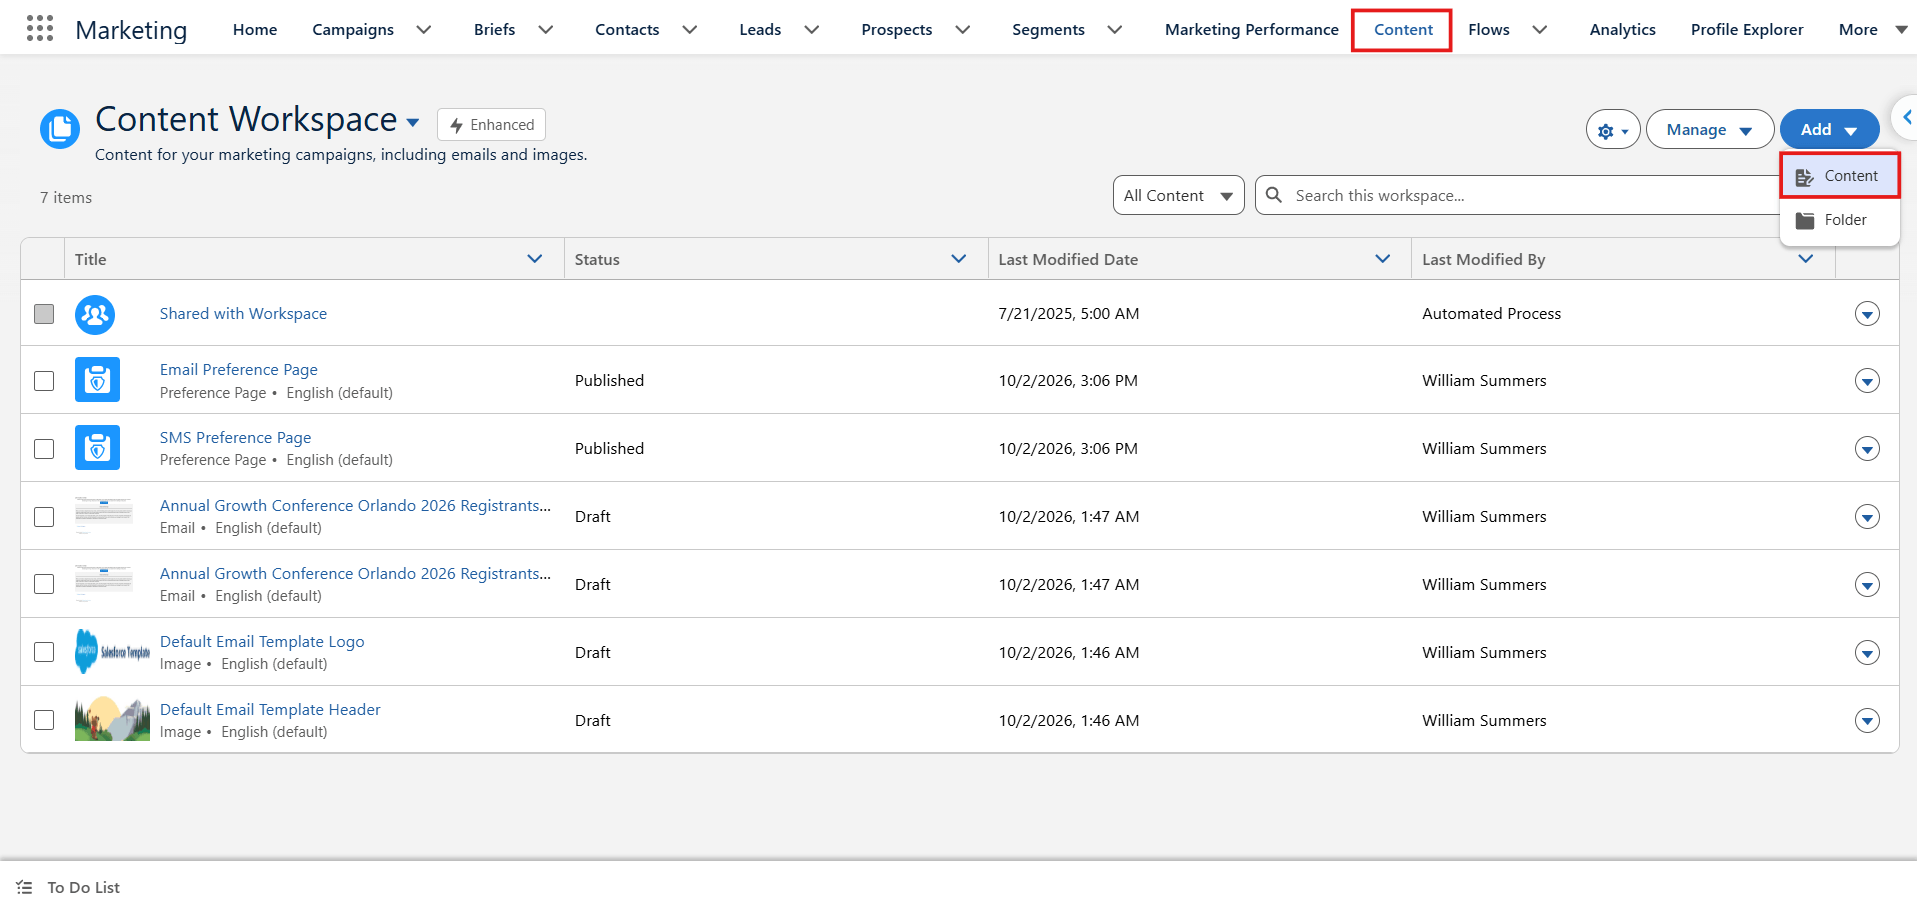
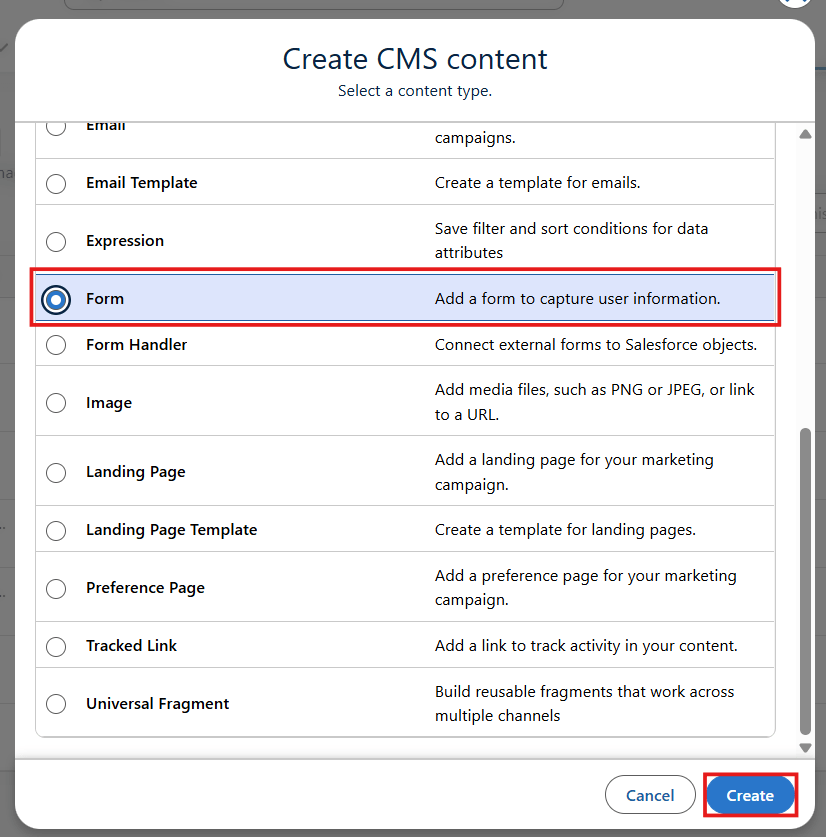
Step 1: Create a New Form
Navigate to the Form creation option in Marketing Cloud Next and create a new Form. If your org provides a guided signup form setup through a campaign, you can use that workflow instead. Enter the required details and name the Form Agentforce Webinar Registration.
Step 2: Configure the Form
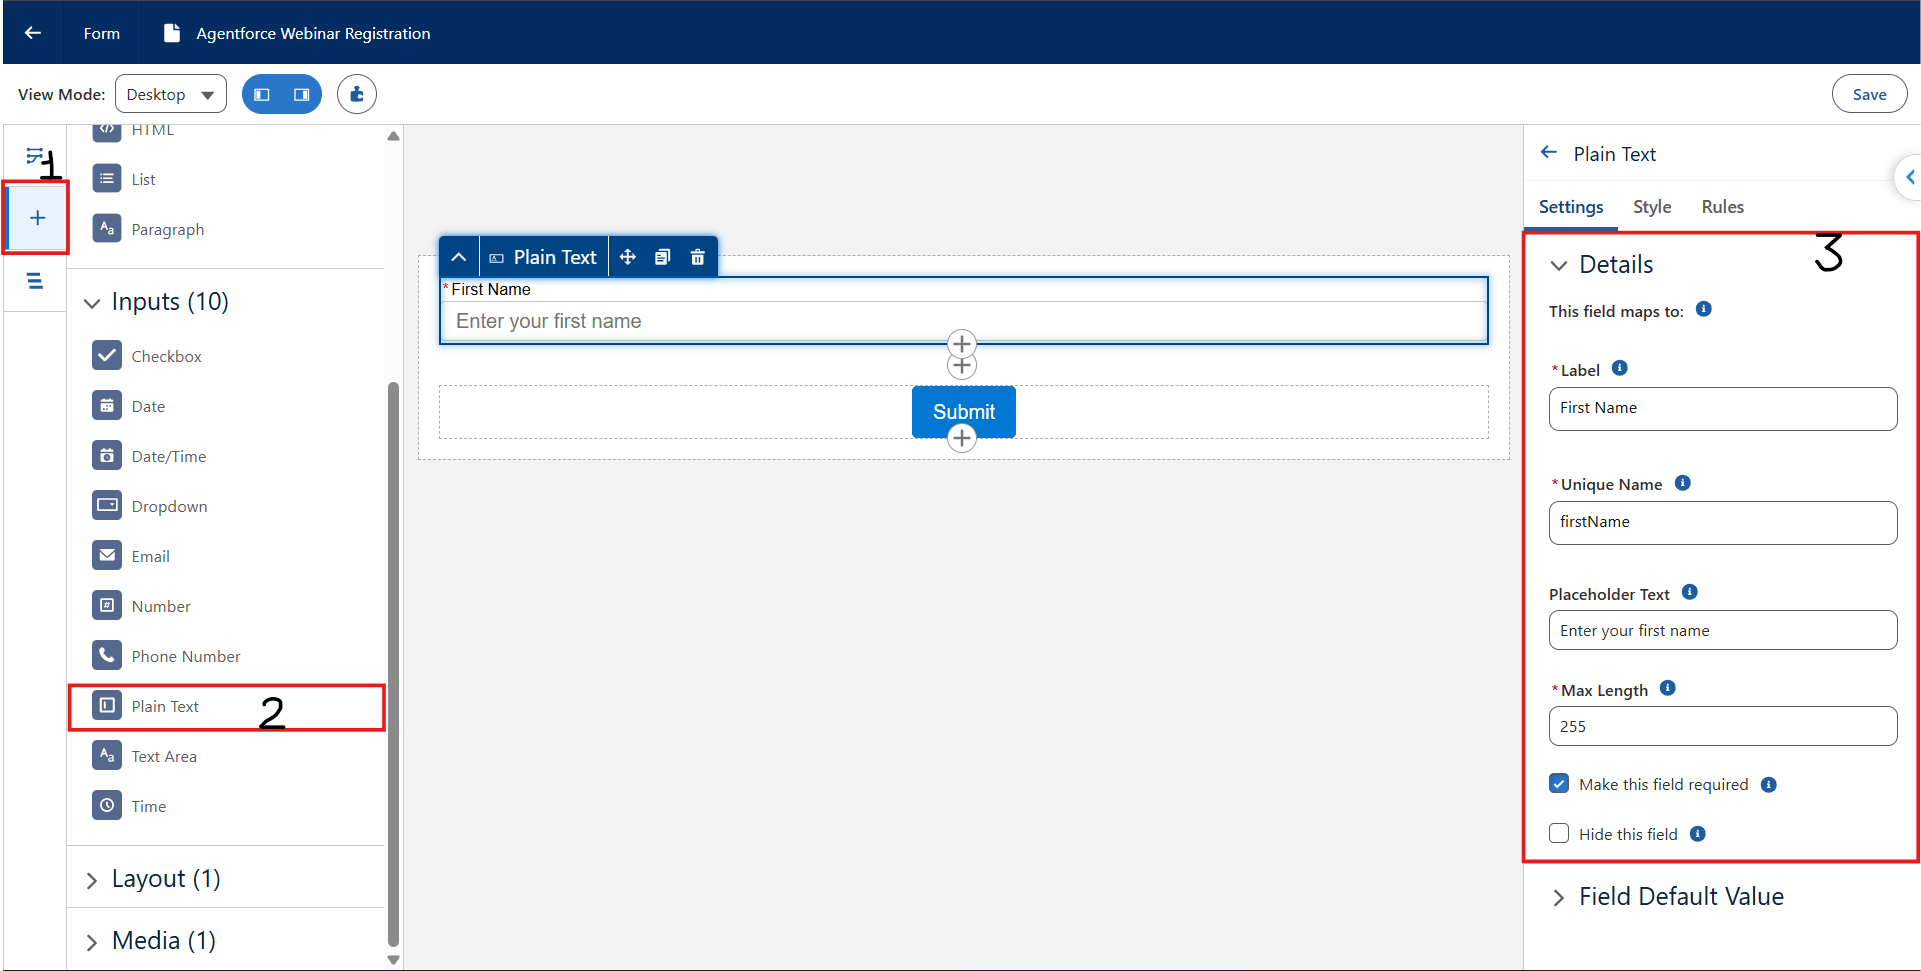
After creating the Form, configure its fields according to the information you want to collect.
For our webinar registration example, we will use the following fields:
- First Name
- Last Name
- Email Address
- Company Name
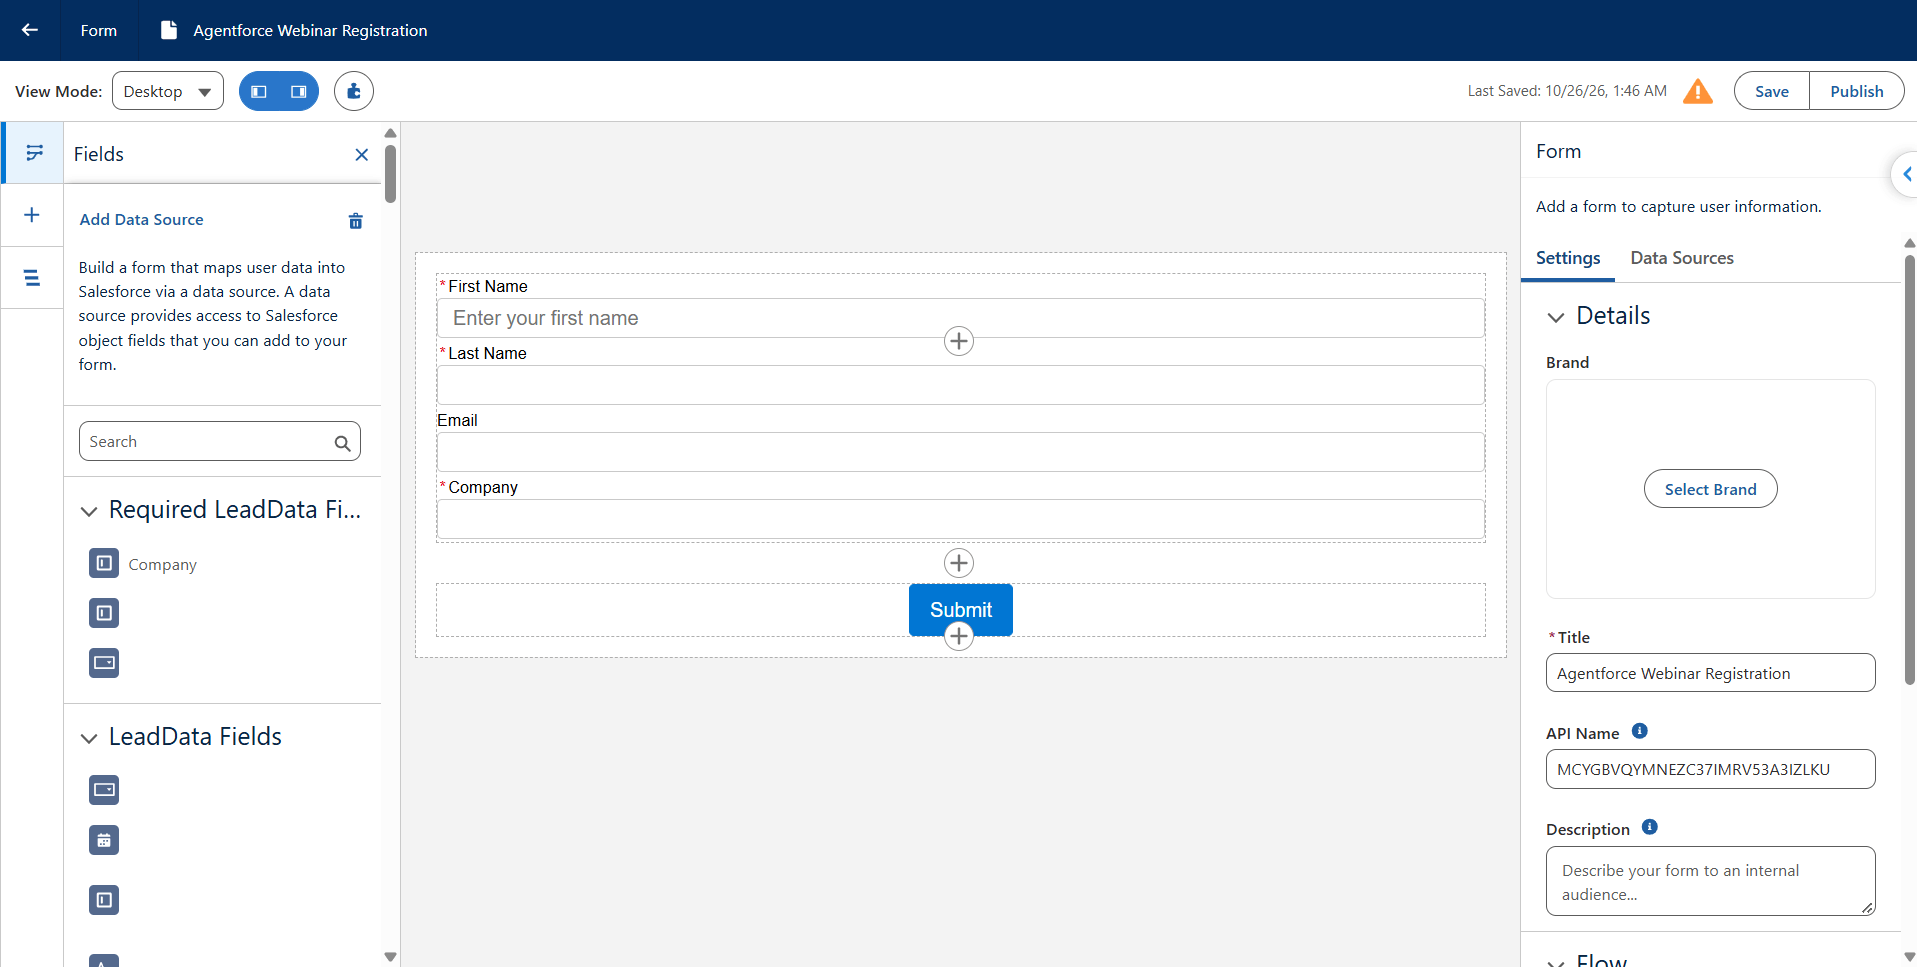
Add the required fields, configure their labels, and specify the appropriate data types according to your requirements.
As shown in the screenshot below, you can add more fields to collect additional information from visitors.
Step 3: Configure the Data Source and Field Mapping (Optional)
Marketing Cloud Next allows you to configure a Data Source to map Form fields to Salesforce object fields. This is optional for the Form creation process and depends on your use case.
For our example, we can use the Lead object to capture information about potential customers.
The field mapping would look like this:
| Form Field | Salesforce Lead Field |
| First Name | FirstName |
| Last Name | LastName |
| Email Address | |
| Company Name | Company |
To configure the Data Source, click Add Data Source, provide a name, and select the Salesforce object you want to use.
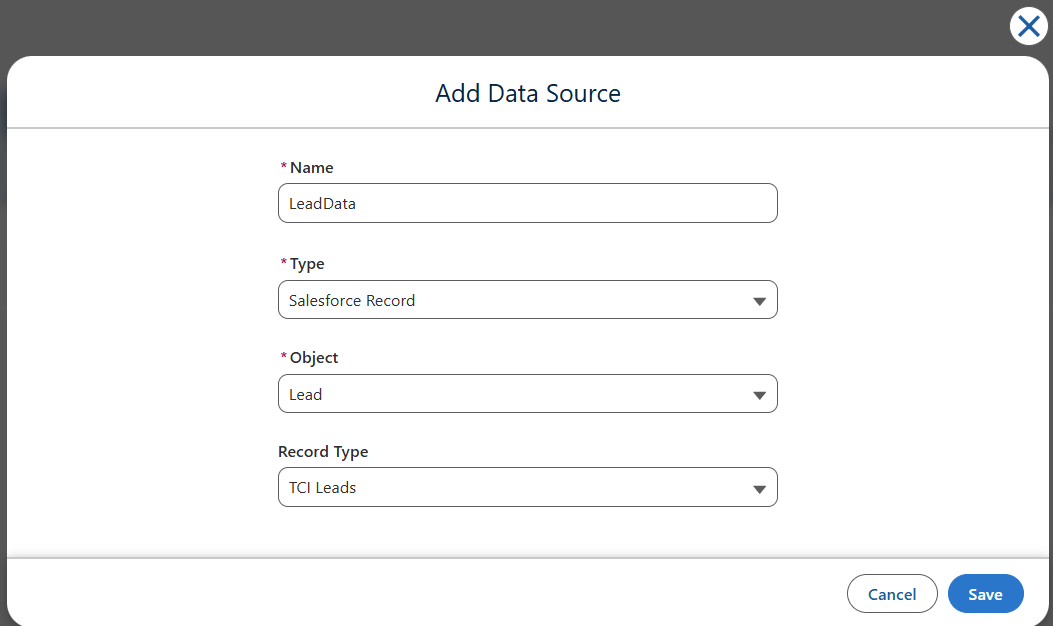
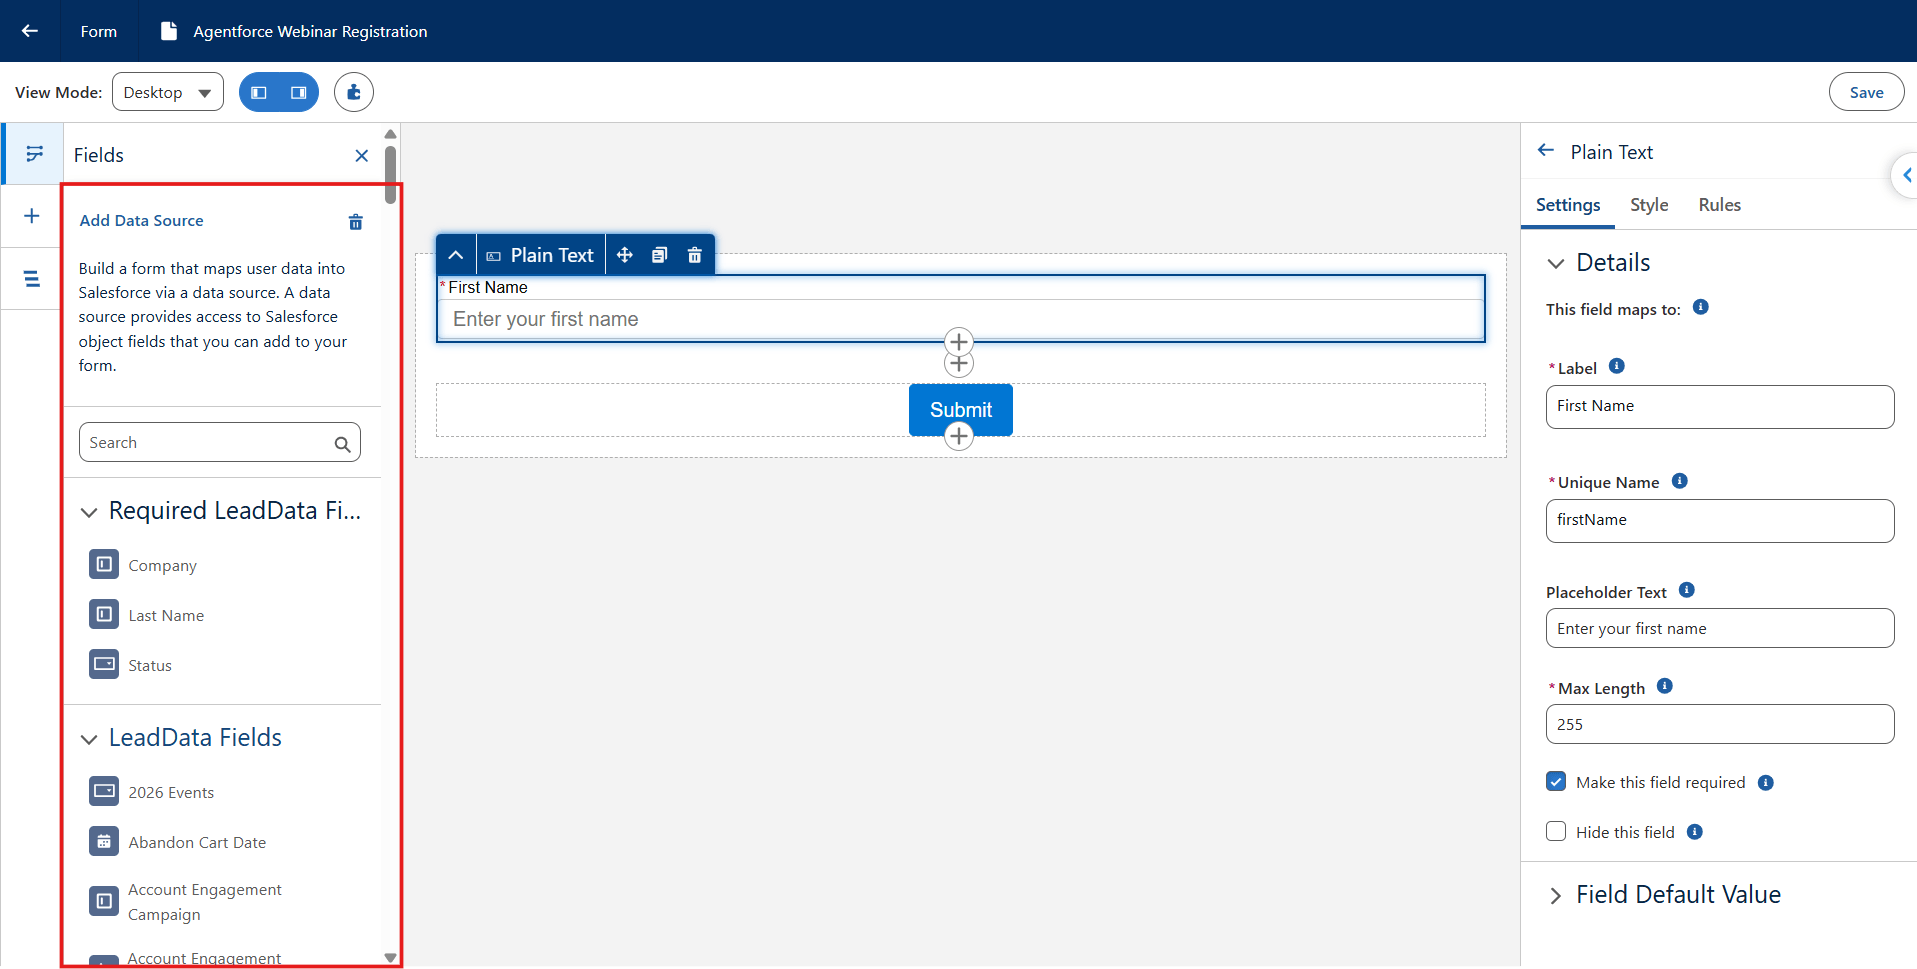
Once the Data Source is configured, you can use fields from the Lead object while building the Form. This allows you to map the information entered by visitors to the corresponding Salesforce fields.
Note: If you choose not to configure a Data Source, you can still build your Form using the available input components and process the submitted values through the associated Flow, according to your configuration.
Step 4: Save the Form
Review the Form configuration and save your changes.
Ensure that the required fields, labels, and data types are configured correctly.
At this point, the Form structure is ready. The next step is to connect it with a Flow to process the submitted information.
2. How to Attach a Flow to a Form
Creating a Form is only one part of the process. A Flow allows you to process form submissions and execute the business logic required for your use case.
For example, when a visitor registers for our webinar, the Flow can process the submitted details and create a Lead record in Salesforce.
Step 1: Create a Flow for the Form
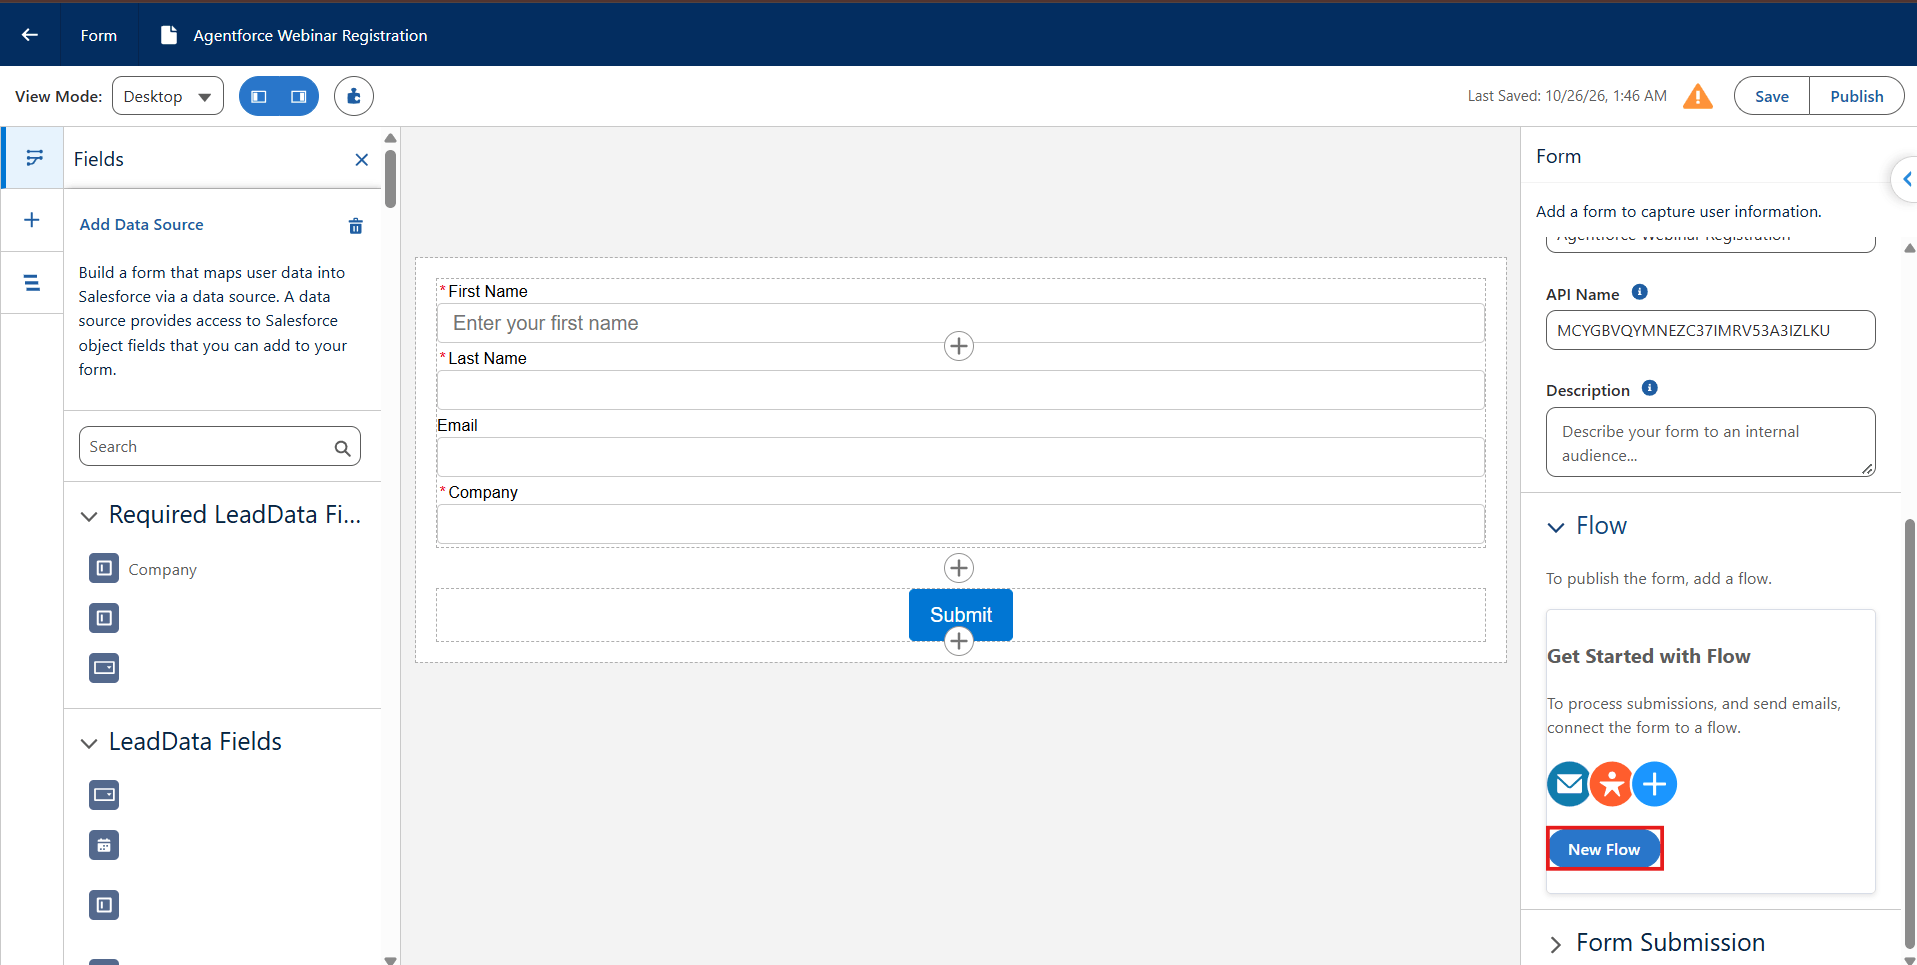
Open the Form and navigate to its associated Flow configuration.
Click New Flow to create a Flow associated with the Form.
Step 2: Open and Configure the Flow
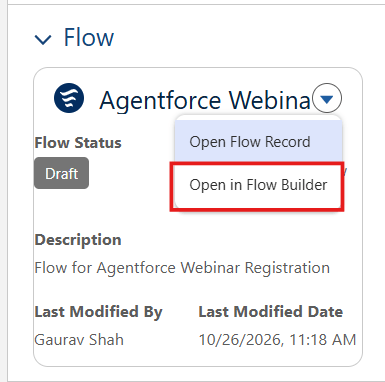
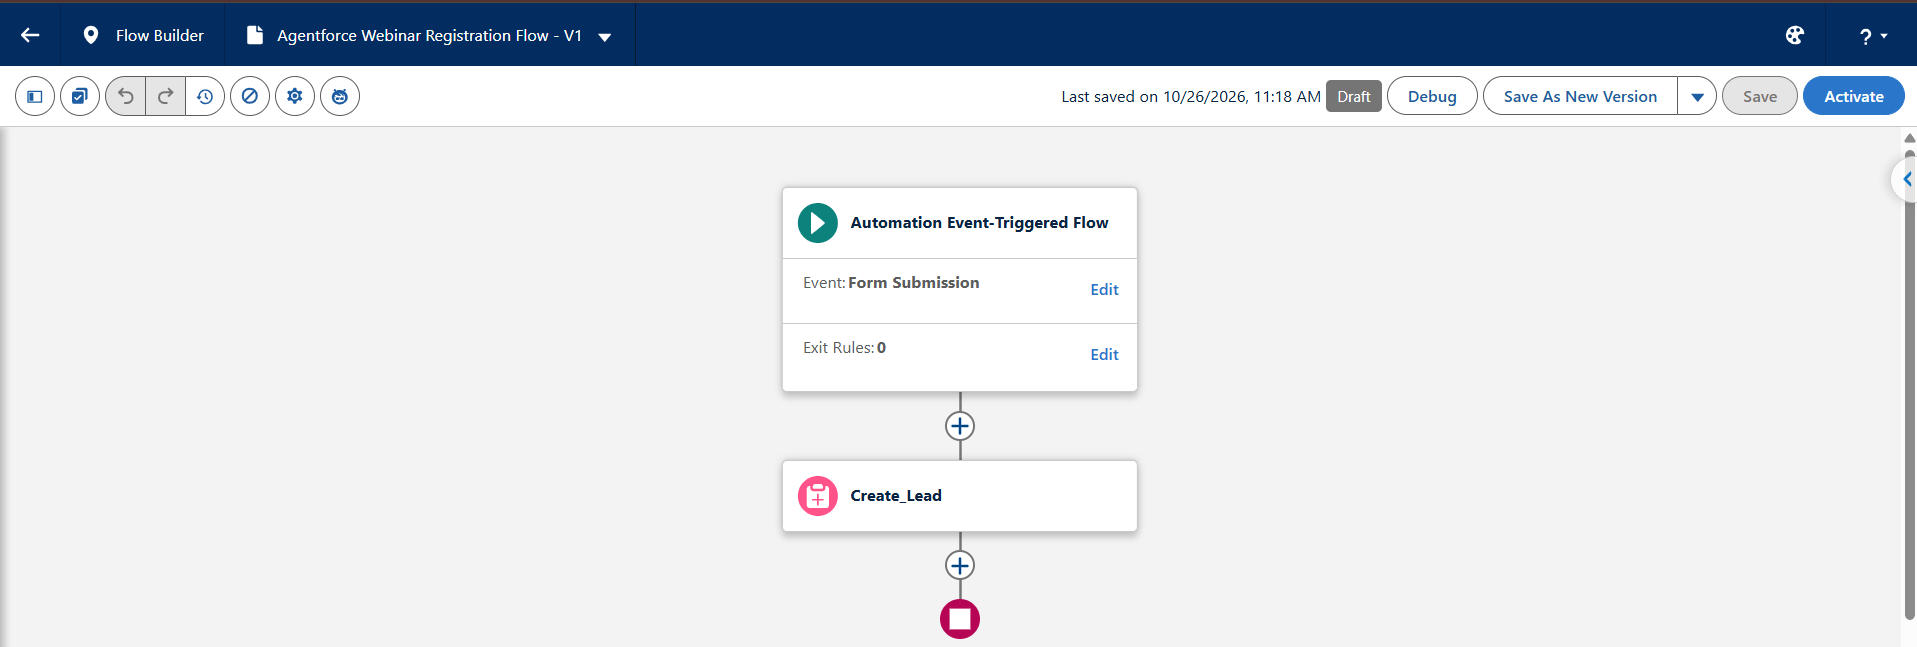
Open the newly created Flow in Flow Builder and review its configuration.
The Flow provides access to the associated Form and can be configured to process the submitted information. Depending on your requirements, you can add elements to create or update Salesforce records and perform other supported actions.
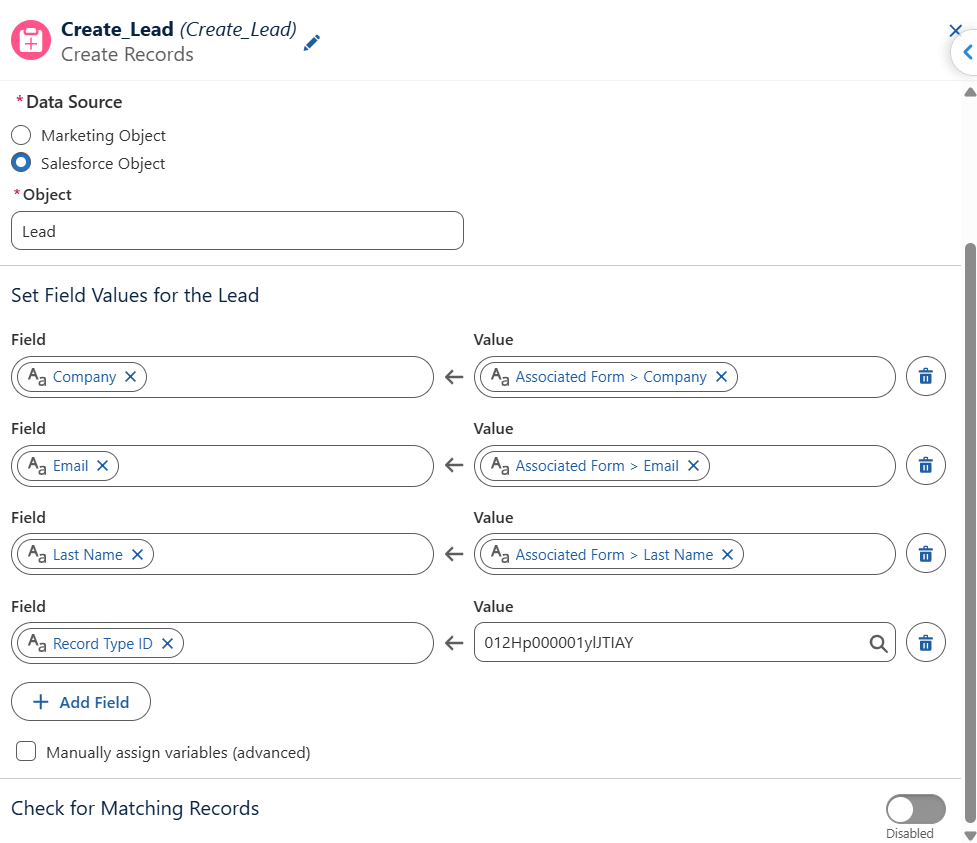
For our webinar registration example, we want to create a Lead record using the information submitted through the Form.
Understanding the Available Fields in the Create Records Element
You may notice that only three fields are available in the Create Records element. Why does this happen?
The available fields depend on how the Form and its Data Source are configured. In our example, the fields exposed through the Data Source are available for selection, while the First Name field was added separately using a Form component.
Therefore, the First Name field needs to be mapped manually in the Create Records element to ensure that the submitted value is stored in the correct Salesforce field.
Important Note: The Form's submitted values are accessible through the Associated Form in the Flow. When configuring record creation, make sure you select and map the appropriate values from the Form rather than assuming that every field is automatically mapped to the target Salesforce record.
Configure the remaining Flow elements according to your requirements.
Step 3: Save, Activate, and Test the Flow
Once the Flow configuration is complete, save and activate it as required.
Submit a test response through the Form and verify that the Flow executes successfully.
For our webinar registration example, confirm that:
- The Form accepts the submitted information.
- The Flow executes successfully.
- The expected Salesforce Lead record is created.
- The submitted values are stored in the correct fields.
After testing the complete process, your Form and Flow are ready for the next stage of publishing and use.
3. Where Can We Use Forms in Marketing Cloud Next?
Once your Form is created and configured, you can use it across different marketing channels to collect information from customers and potential leads.
- Emails: Include a link to your Form in marketing emails to collect registrations, gather customer information, or encourage users to request a product demo.
- Landing Pages: Add the Form to a landing page where visitors can submit their details to register for webinars, download resources, or learn more about your products and services.
- Lead Generation Campaigns: Share the Form through marketing campaigns to collect information from potential customers and support lead generation activities.
- Webinar and Event Registration: Use the Form to collect attendee details, such as name, email address, and company, when promoting webinars, training sessions, or events.
- Newsletter Subscriptions: Allow visitors to submit their email addresses and marketing preferences to sign up for newsletters and updates.
- Product and Service Inquiries: Share the Form through emails or landing pages to collect inquiries from customers interested in your products or services.
By using Forms across these channels, marketers can make it easier for users to submit their information and connect those submissions with Salesforce processes through the associated Flow.
Conclusion
Forms in Salesforce Marketing Cloud Next provide a practical way to collect customer information and connect submissions with Salesforce automation.
In this blog, we covered how to create a Form, configure its fields, optionally use a Data Source, and associate a Flow to process form submissions.
By combining Forms with Salesforce Flow, businesses can support lead generation, webinar registrations, customer inquiries, and other marketing activities.
The key takeaway is that Forms collect the information, while the associated Flow enables you to process that information according to your business requirements.