A Comprehensive Guide to Content Builder in Salesforce Marketing Cloud
Content Builder is a very important and commonly used tool/app within Marketing Cloud.
It is used for creating and sending emails.
There are two paths by using which Content Builder can be accessed.
1) It can be clearly seen on the main page of the Marketing Cloud Platform where all other studios/tools are there.
2) It can be found under Email Studio by the name 'Content' besides the 'Overview' tab.
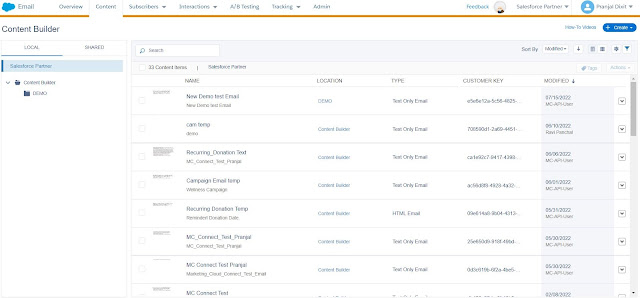
Let's have a deep insight into Content Builder. In the above image Left hand side shows the spaces where emails will be stored. They are termed as 'Local' and 'Shared'.
- Local suggests that emails will be stored in this folder within any specific Business Unit
- Shared suggests that emails will be stored in this folder which will be shared with other Business Unit/Units depending upon the requirement.
- Properties comes under 'Edit' which includes options like Name, Description and Location of an email. Changes can be made using the Properties option.
- Preview and Test' simply allows a user to preview an email before performing a real send. This gives a clearer view of an email as to how it will appear at the receiver's end.
- Move allows a user to change the location of an email if required.
- Duplicate' allows a user to make another copy of the same email if small changes need to be made for that email.
The main page of Content Builder shows a list of emails available. Details include name, location, type and modified date for all the emails.
The drop down option on the right hand side includes options like Edit, Properties, Preview and Test, Share, Move, Duplicate, Delete for an email.
Performing 'Preview and Test' of an email is a good practice which should always be performed before sending an email. While doing so there is an option to select Subscriber for previewing purpose.
NOTE: The Subscriber selected at the time of preview should be in Active Status in the All Subscriber List.
Creating an Email
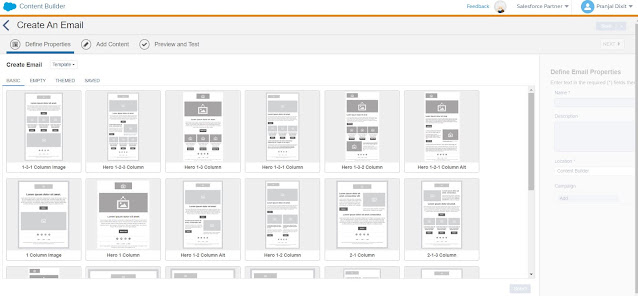
The 'Create' option on top on the right hand side of the main page allows various options
for email creation.
Email Message: There are various options available like Template, Template+Amp, HTML, HTML+AMP, Text Only, Existing Email.
1) Template: As name suggests this option has in-build email templates which can be used to create an email as per the requirement.
2) Template+Amp: This option can be used in a combination of Template and Amp script
3) HTML: If a user wants to customize an email and is well versed with HTML then this option is best suited.
4) HTML+AMP: This option works in a combination of Template and HTML where a user can use HTML in the Pre-designed email templates to make changes and define email as required.
5) Text Only: This option is used when basic email is created with simple language without the use of any additional template, language etc.
6) Existing Email: As the name suggests this uses existing emails available.
Let's discuss all the important topics individually.
1) Send Classification
It includes three aspects.
a) Sender Profile: It defines 'From' (From Name, From Address)
b) CAN-SPAM priority: It includes Profile Center, CAN-SPAM laws should be followed before performing an email send.
c) Delivery Profile: It defines 'what' (IP Address, Header, Footer)
2) Email sends generally are classified as Commercial and Transactional.
- Commercial Emails/messages: These are the ones which we receive as a part of any marketing/promotional campaign.
- Transactional Emails/messages: These are the ones which we receive once any transaction is T done and we receive it as a response to it.
While Content Builder is widely used for creating email content, Salesforce Marketing Cloud also enables communication across mobile channels such as SMS and push notifications through Mobile Studio. Using the same customer data and content strategies, marketers can extend their campaigns beyond email to reach users on their mobile devices.
NOTE: Once a subscriber unsubscribes he/she will not be receiving any Commercial Emails but will continue receiving Transactional Emails/messages
There are 5 types of Email Sends
- Guided Send: This email send has to be performed manually where a user has to select the recipient. It can be send to Lists, Data Extensions. As a good practice users can select the "De-duplicate subscribers by email address" option while sending if they don't want subscribers to receive multiple emails.
- Test Send: This is generally performed before a Real email send to check performance of an email. 'Preview and Test' option is used to check the appearance of an email at the receiver's end.
- Simple Send: As the name suggests it is a one step send with sending limitations. It is quick in process.
- Triggered Send: It is a real-time send. It triggers once an event occurs.
- User-Initiated Send: When a user replies to the Triggered email, it is a User-Initiated email.
3) A/B Test is a testing method where two versions of an email are created and sent to a test population where one version will come out as a winner so that it can be used for real email sending. Either CTR(Click Through Rate) or Open Rate is tracked to check which version has received higher response.
A/B testing can be performed on:
-- Subject Lines
-- Emails
-- Content Areas
-- From Names
-- Send data and send time
-- Preheaders
After identifying high-performing content through A/B testing, marketers can extend these winning strategies to digital advertising channels. Salesforce Marketing Cloud provides Advertising Studio, which allows marketers to create targeted advertising campaigns using the same audience data and insights derived from email campaigns. This helps ensure consistent messaging across email and advertising platforms.
4) Unsubscribe - There are three types of Unsubscribe
a) Global Unsubscribe - After doing this every email from the Marketing Cloud account will be unsubscribed.
b) Master Unsubscribe - Every email will be unsubscribed at the Organization level.
c) List level Unsubscribe - Subscribers are unsubscribed from Publication List
- Let's find out different ways to individualize the content of an email.
1) Personalization Strings:They can be used in the Subject Lines, Preheader and body of the email.
2) Dynamic Content
3) Coding using Guide Template Language or Amp script
- Lets' have a look into the ways to create an Email Template.
1) Existing Template - Themed, Basic, Saved, Empty
2) HTML
- Looking at the tools/parameters prior setting an email.
1) Content Detective
2) Validation
3) Preview
4) Test Email
- Looking at different ways to import a file.
1) Import Wizard: This is a manual import where a file is imported manually from the system.
2) File Transfer Activity: This activity is used in the Automation to import the file as required.
3) Via API
- Lastly have a look at different ways to map data which we will discuss further in the Automation Studio section.
1) Map by Header Row
2) Map by Ordinal
3) Map Manually
4) Map by Header
Personalized content created in Content Builder can also be extended to web experiences using Web Studio. Web Studio allows marketers to create landing pages, forms, and microsites that deliver consistent and personalized experiences to users. By integrating Content Builder with Web Studio, businesses can maintain unified messaging across email and web channels.
Salesforce Marketing Cloud offers a comprehensive ecosystem of tools including Content Builder, Mobile Studio, Advertising Studio, and Web Studio to create and deliver personalized customer experiences across multiple channels. Content Builder acts as the foundation for content creation, which can be reused and extended across these platforms. To explore more tutorials, guides, and best practices, visit our Salesforce Marketing Cloud page.